Mar 2008
coffee-shop class #3: wrap-up
03.26.08 | coffee-shop
class
we had a radtastic class of photographers attend
coffee-shop class #3 this evening. there were
lots of lightbulbs fiickering on upstairs, which
is the reason our
coffee-shop classes were started in the first
place.
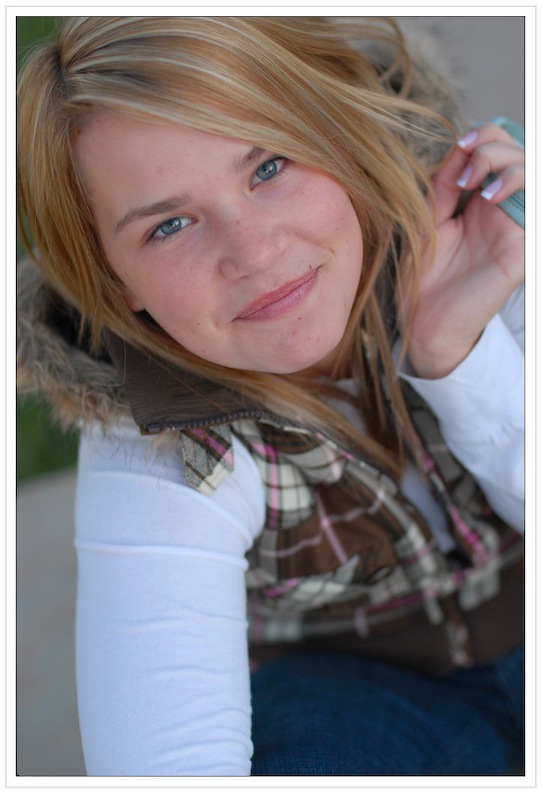
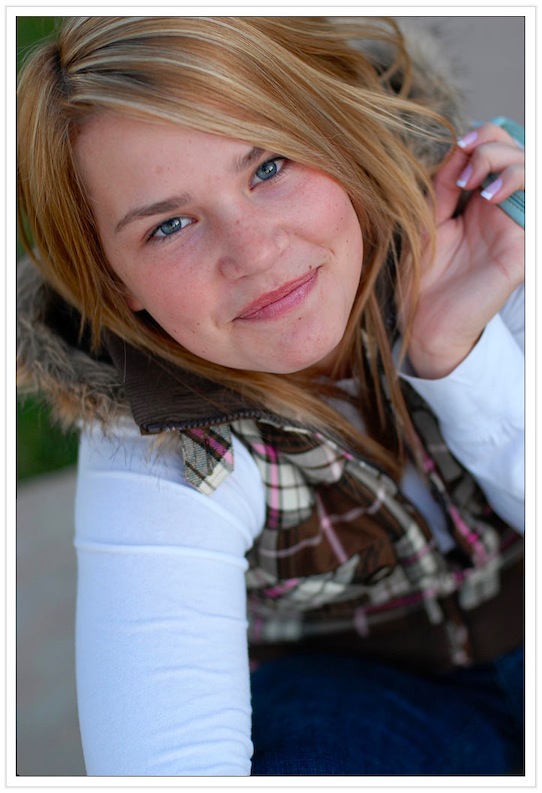
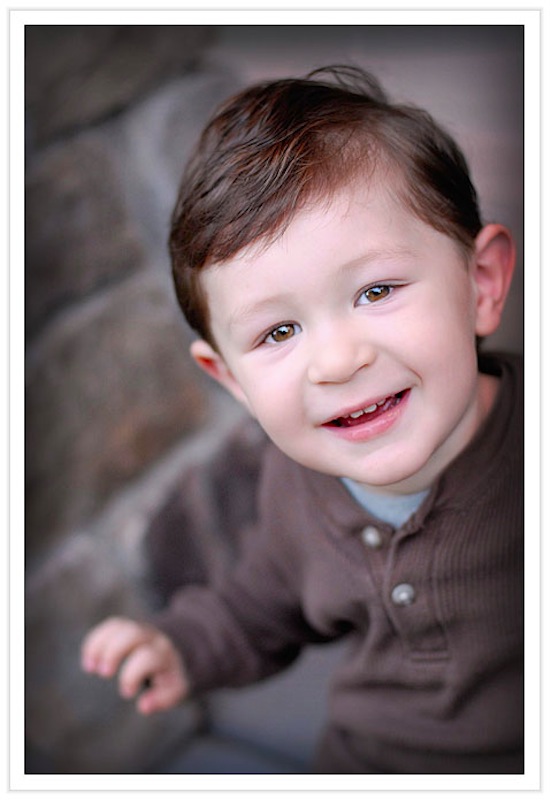
one thing we talked about was how to selectively choose a background based on how well it will serve as an out of focus background. i chose a colorful graffiti wall and shot it deliberately out of focus by turning the manual focus on my lens until i liked what i saw. it thought it kinda looked like a watercolor painting or pastel smeared.... definately good enough for an available light portrait background:

you could try this technique on anything and may be surprise what creative stuff you could create!
the next step was to look at those little numbers on lens that tells me my distance in feet/meters to subject needed to focus (i had to remember to multiply 1.5 for the d-80 i was using). or you could just wing it and focus however you normally would... the key is to think about the out of focus before you shoot. that is the lesson here, folks.
i then needed a subject to drive my point home. the one and only paige elizabeth stepped right in to model :)
my 85mm lens said it would focus on anything at a distance of 4 feet on the depth of field preview measurement answer thingy, so i multiplied it by 1.5 in my head and told her to stand about 6 feet away. i fine tuned the focus on one eye (notice the other eye is slightly out of focus due to the shallow depth of field of f/1.4). i then i waited for a decent moment and snapped this shot:
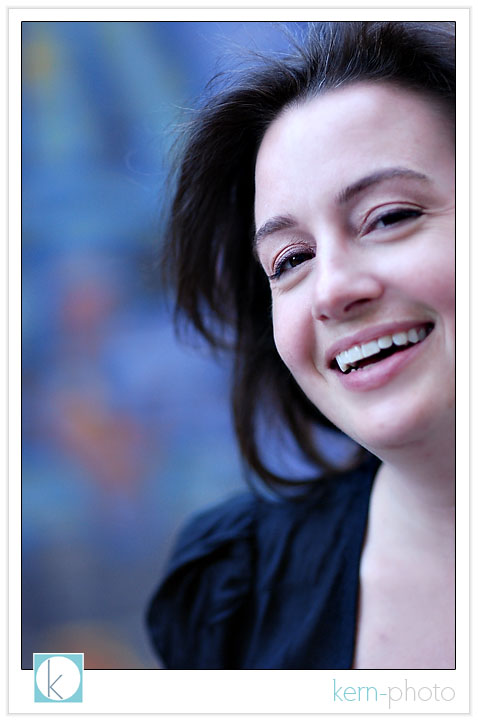
no one would ever suspect the background to be graffiti, but the combination of good bokeh, shallow depth of field, and short working distance, worked to a decent effect. it helped that the alley we shot in had nice diffused light and we had a willing model readily available :)
before we went out to shoot, i gave a mini-lecture in starbucks which you can view by clicking HERE (careful: it is 11MB PDF download).
a special thanks to ken rockwell for posting a wonderful article on 85 mm bokeh comparision highlighting several of the topics we spoke about today. his images are worth 1,000 words.
mark your calendars for our next class on april 20 at 4:20pm meeting outside the denver art museum. smoke 'em if you got 'em. just kidding :)
i'll present on how to make a killer octabank-style softbox for under $50 that offers nearly identical light as this but for a $1,000 less. you will not want to miss this coffee-shop class!
ps- there will be a trash the dress session at 5pm at the denver art museum. i hope to be using my little invention during the shoot so you can see it in action.
one thing we talked about was how to selectively choose a background based on how well it will serve as an out of focus background. i chose a colorful graffiti wall and shot it deliberately out of focus by turning the manual focus on my lens until i liked what i saw. it thought it kinda looked like a watercolor painting or pastel smeared.... definately good enough for an available light portrait background:
you could try this technique on anything and may be surprise what creative stuff you could create!
the next step was to look at those little numbers on lens that tells me my distance in feet/meters to subject needed to focus (i had to remember to multiply 1.5 for the d-80 i was using). or you could just wing it and focus however you normally would... the key is to think about the out of focus before you shoot. that is the lesson here, folks.
i then needed a subject to drive my point home. the one and only paige elizabeth stepped right in to model :)
my 85mm lens said it would focus on anything at a distance of 4 feet on the depth of field preview measurement answer thingy, so i multiplied it by 1.5 in my head and told her to stand about 6 feet away. i fine tuned the focus on one eye (notice the other eye is slightly out of focus due to the shallow depth of field of f/1.4). i then i waited for a decent moment and snapped this shot:
no one would ever suspect the background to be graffiti, but the combination of good bokeh, shallow depth of field, and short working distance, worked to a decent effect. it helped that the alley we shot in had nice diffused light and we had a willing model readily available :)
before we went out to shoot, i gave a mini-lecture in starbucks which you can view by clicking HERE (careful: it is 11MB PDF download).
a special thanks to ken rockwell for posting a wonderful article on 85 mm bokeh comparision highlighting several of the topics we spoke about today. his images are worth 1,000 words.
mark your calendars for our next class on april 20 at 4:20pm meeting outside the denver art museum. smoke 'em if you got 'em. just kidding :)
i'll present on how to make a killer octabank-style softbox for under $50 that offers nearly identical light as this but for a $1,000 less. you will not want to miss this coffee-shop class!
ps- there will be a trash the dress session at 5pm at the denver art museum. i hope to be using my little invention during the shoot so you can see it in action.
...
holga landscapes 101
03.23.08 | photo-resources
- travel &
escapes
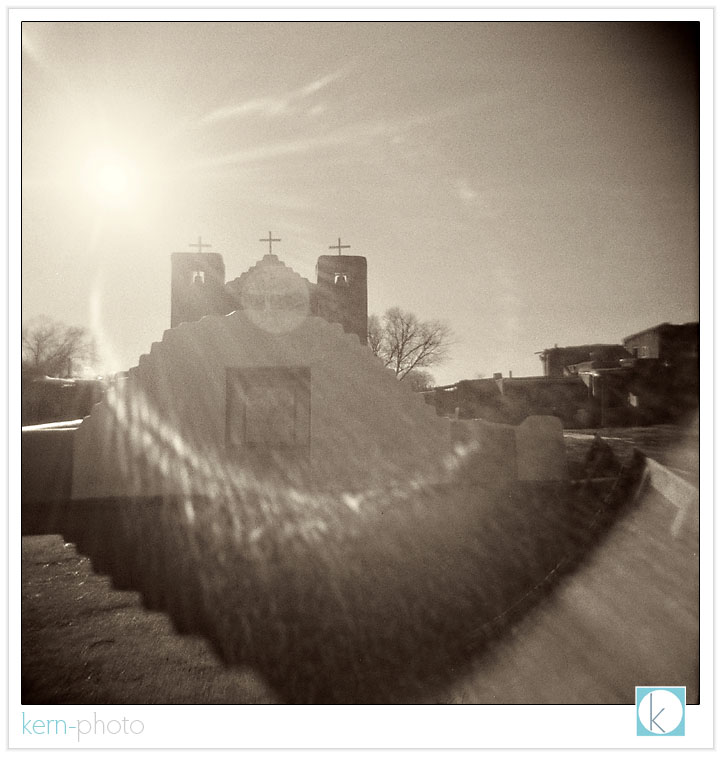
100% true to heart of the artist inside is what
this post is all about. it's been over 6
years since i've shot film, which seems way too
long. here's what can be done with the simple
love of photography, a $30 holga
medium-format camera, three rolls of ilford sfx
120m film, a psuedo-infrared filter, and some
'old skool' inspiration:
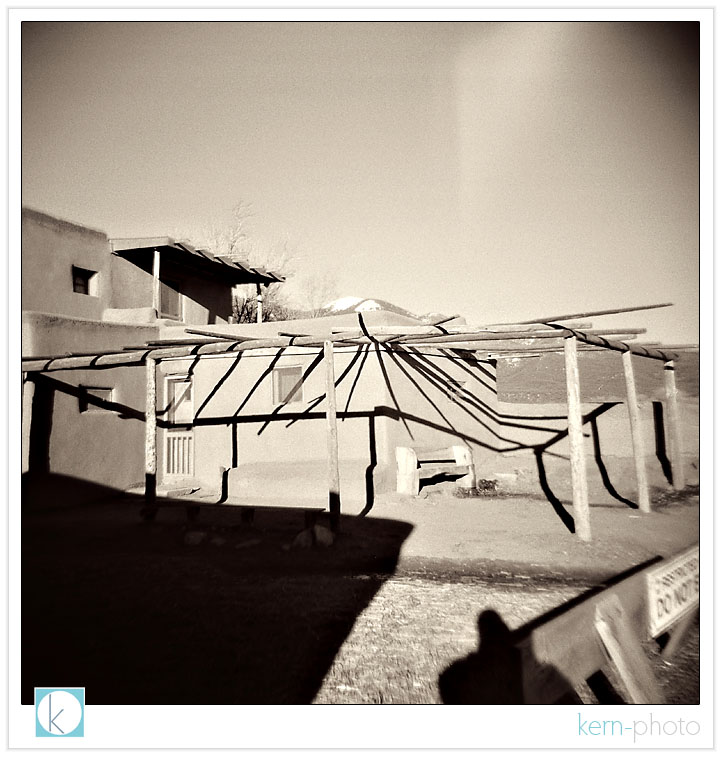
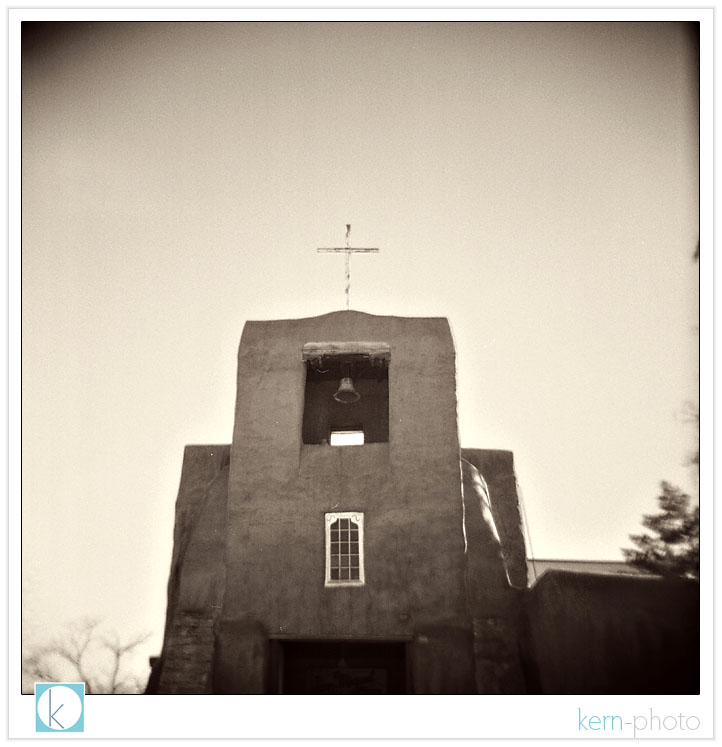
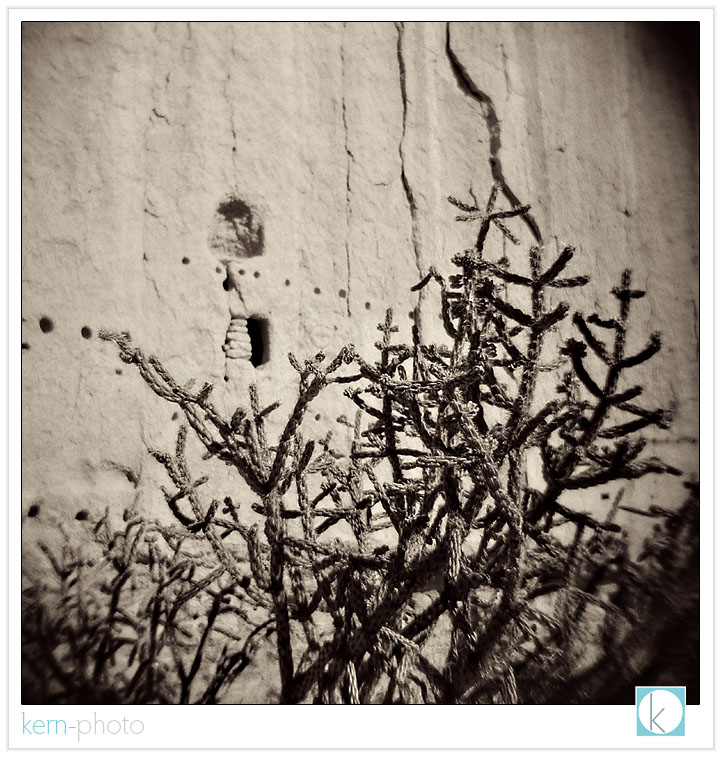
pueblo de taos church (taos, new mexico)
pueblo de taos village 1.
pueblo de taos village 2.

pueblo de taos village 1.
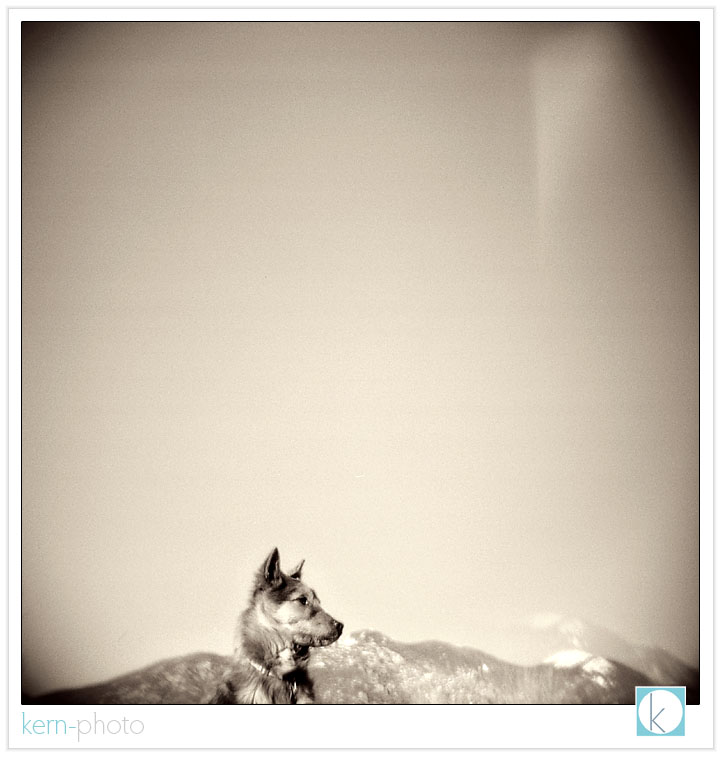
reservation dog.
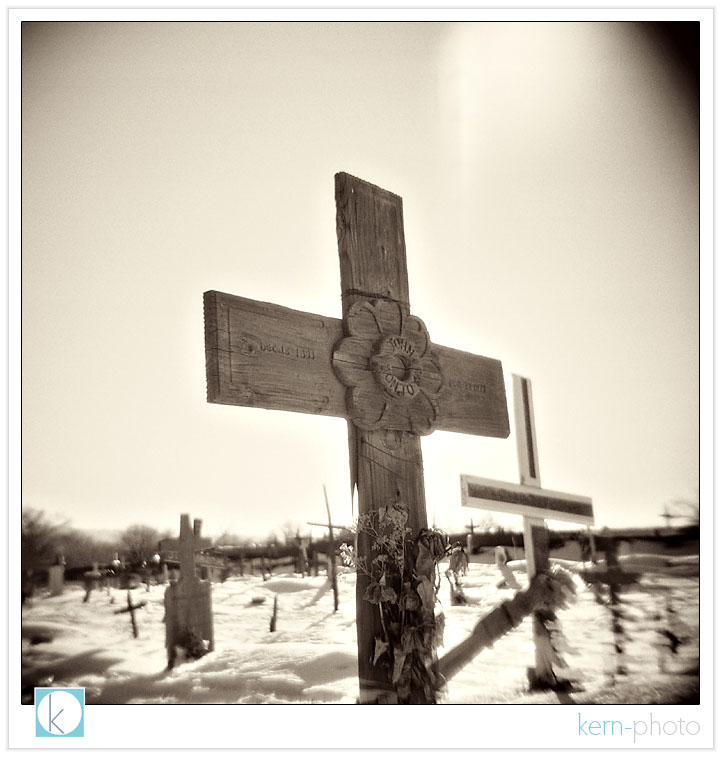
cemetery at pueblo de taos 1.
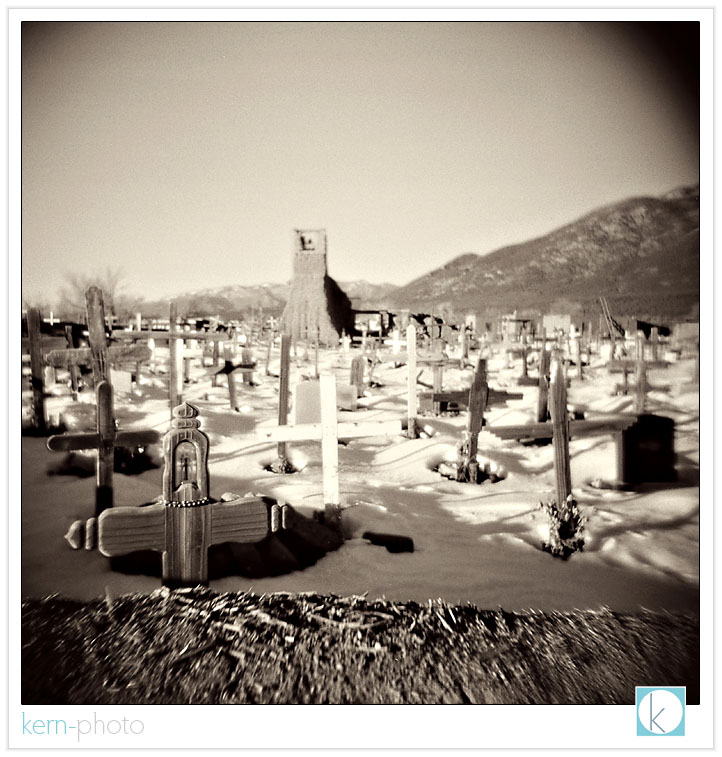
cemetery at pueblo de taos 1.
pueblo de taos home front 1.
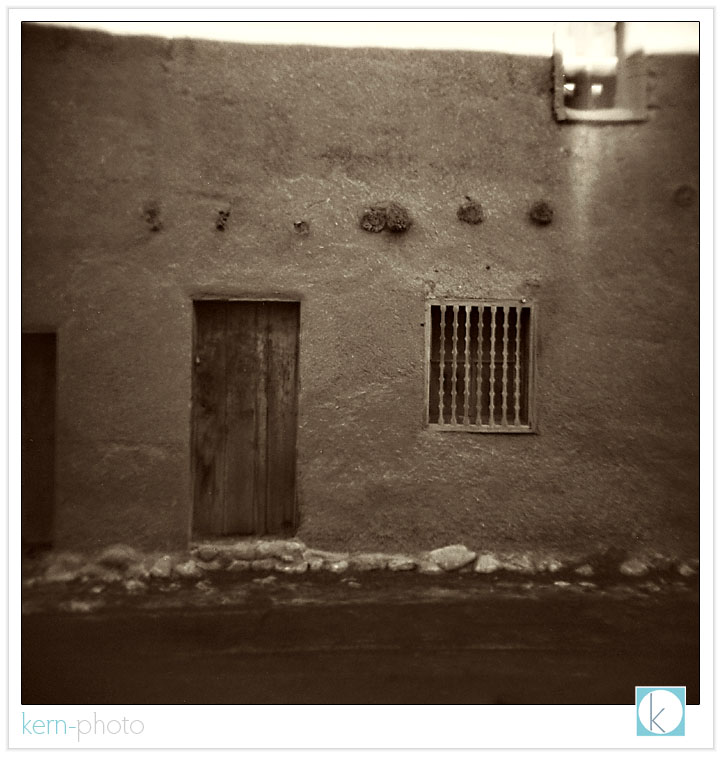
pueblo de taos home front 2.
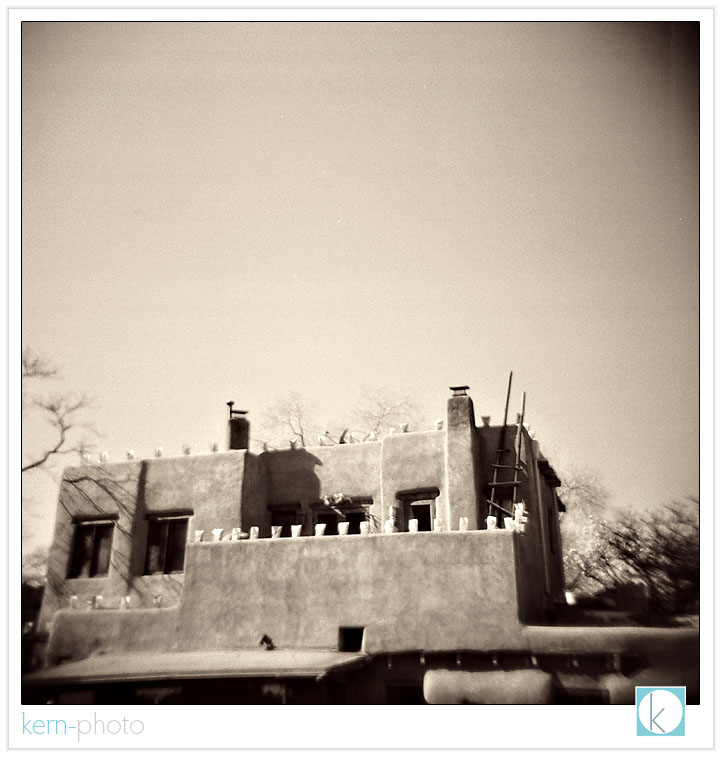
pueblo de taos church 1.
25 minutes prior to speeding ticket (salida, colorado).
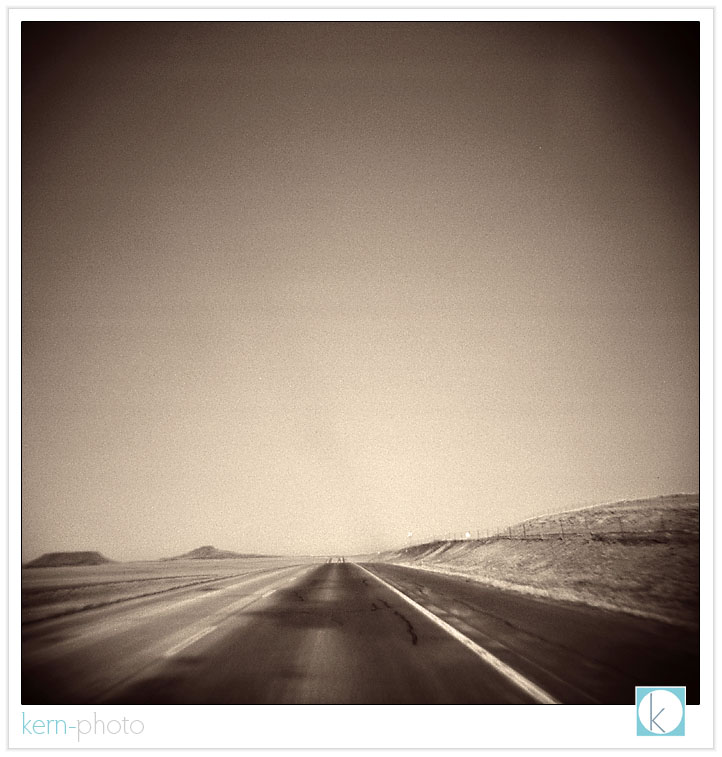
ranch in salida.
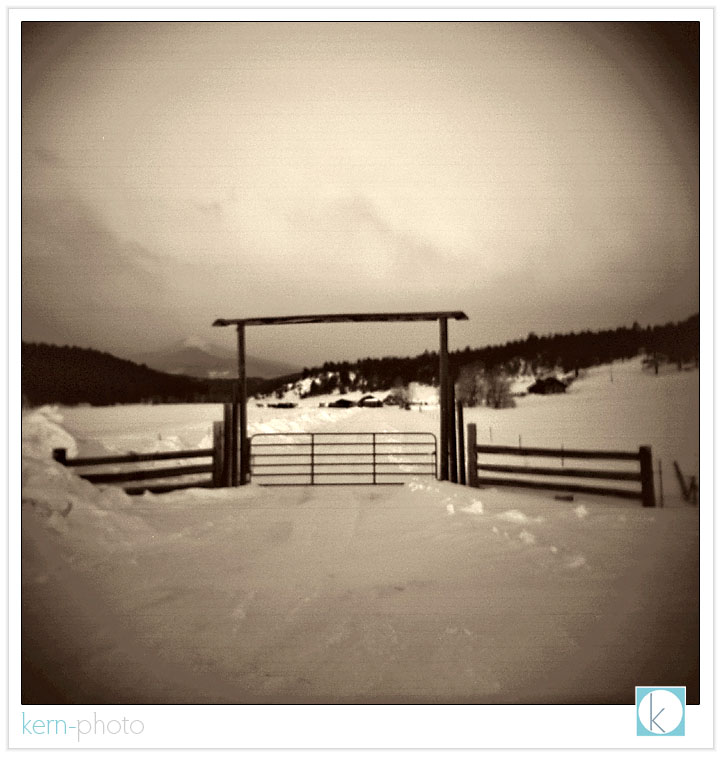
bandeleir national monument 1 (colorado).
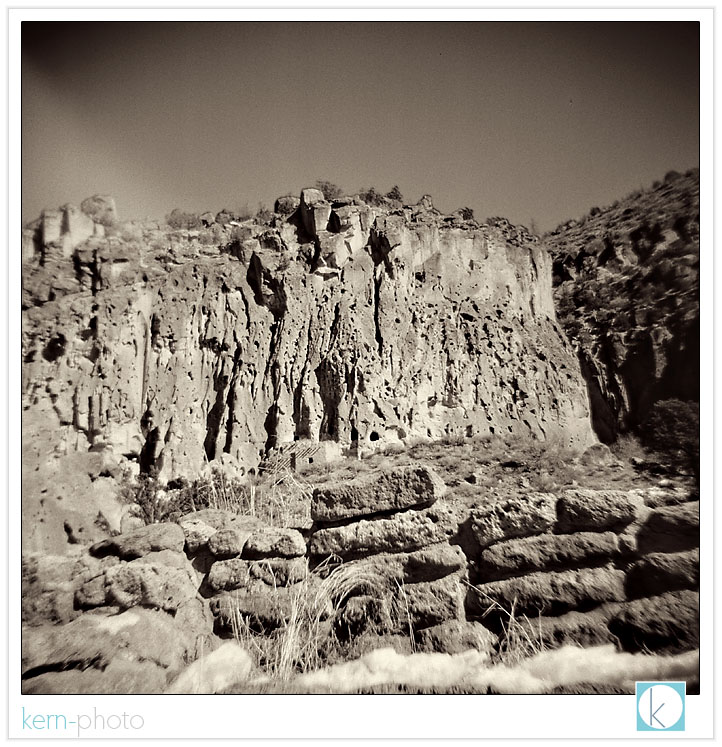
bandeleir national monument 2.
bandeleir national monument 3.
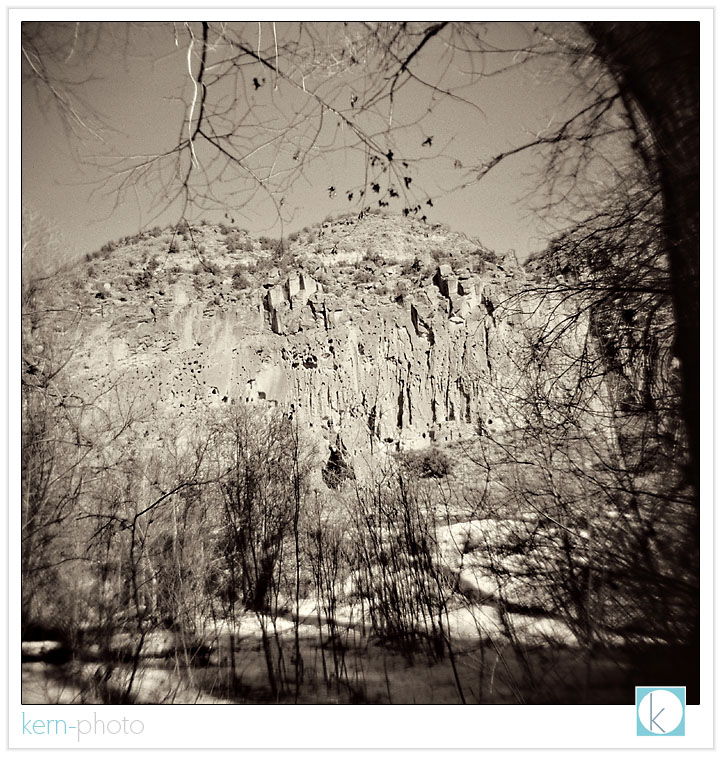
nicole on trail in bandeleir national monument.
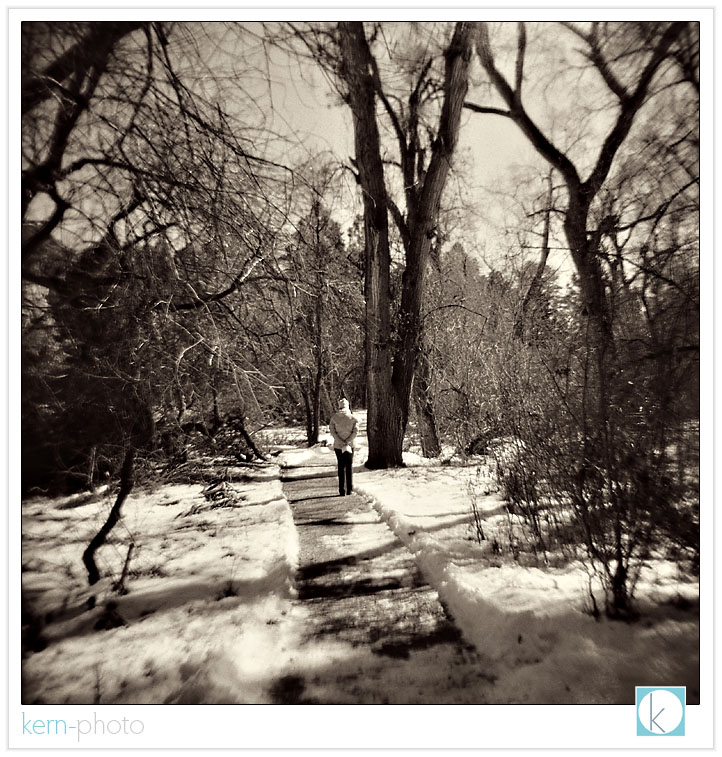
i'd like to think each of these 16 photos could stand alone printed on a 30" x 30" gallery canvas, thanks to the wonderful resolution of medium-format film :)
pueblo de taos church (taos, new mexico)
pueblo de taos village 1.
pueblo de taos village 2.
pueblo de taos village 1.
reservation dog.
cemetery at pueblo de taos 1.
cemetery at pueblo de taos 1.
pueblo de taos home front 1.
pueblo de taos home front 2.
pueblo de taos church 1.
25 minutes prior to speeding ticket (salida, colorado).
ranch in salida.
bandeleir national monument 1 (colorado).
bandeleir national monument 2.
bandeleir national monument 3.
nicole on trail in bandeleir national monument.
i'd like to think each of these 16 photos could stand alone printed on a 30" x 30" gallery canvas, thanks to the wonderful resolution of medium-format film :)
catalina island
03.22.08 | travel &
escapes
22 miles off the coast of los angeles,
catalina island was our favorite cruise ship
port of call on this cruise. we visited the small
town of avalon, where resides about 85% of
catalina island's 4000 residents. avalon reminded
us of a thawed-out version of colorado's crested
butte with a shared zest for a simple
life, plenty outdoors pursuits awaiting out
the front door, colorful characters, and
brightly painted homes.
this trip we took a few rolls with the holga (a medium format film camera which costs under $30!), our nikon d-80, a few lenses, and no tripod.
given we are photographers, it is surprising to see how little we actually photograph each other (other than cheesy test shots to check if equipment is working properly). however, vacationing is a grand time to experiment with different techniques and photograph for the love of the art. and the best part is we can enjoy the keeper shots and frame for our home :)
this is almost a week's worth of scruff from not shaving... nicole says she spotted gray hair in my facial hair ( i can not call it a beard). yet another sign of approaching 30.
another classic kern-photo self-portrait made with our favorite super wide-angle nikon 12-24 f/4 lens.

there are few gas stations on the island since bikes and golf carts serve as a popular mode transportation.

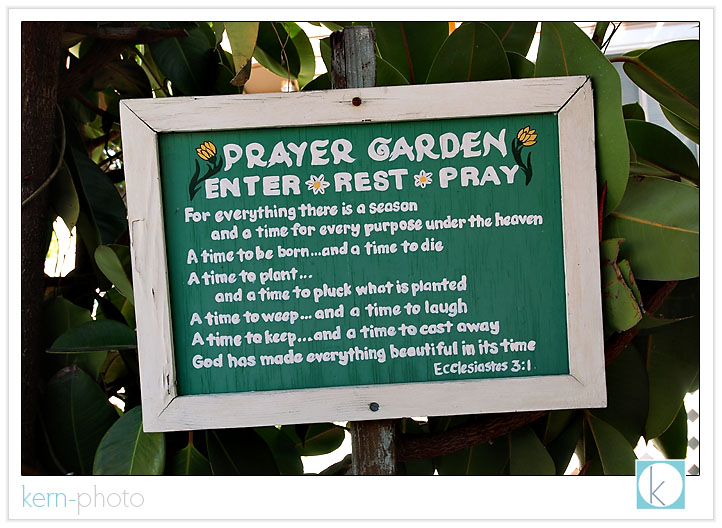
we liked this prayer:
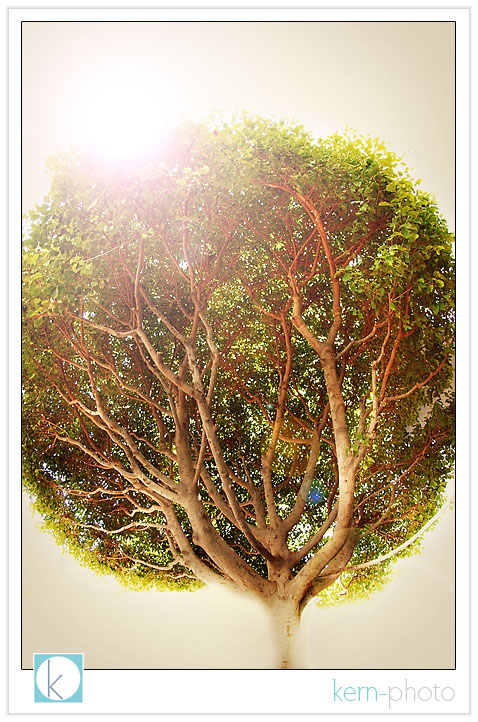
this random tree in struck our interest. we whipped out our 10.5mm fish-eye lens looked up just before taking this snap:
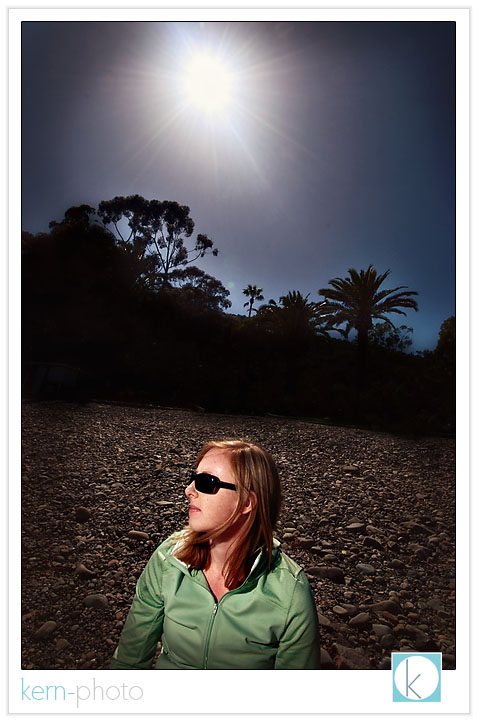
i fired this shot of nicole to see if a little sb-800 could overpower the sun... mission accomplished using f/13 at 1/200 sec, iso 100 (one sb-800 flash provided the light on nicole, which was set at manual full-power and triggered wirelessly with our nikon d-80 pop-up flash as a commander, such a cool little trick :)
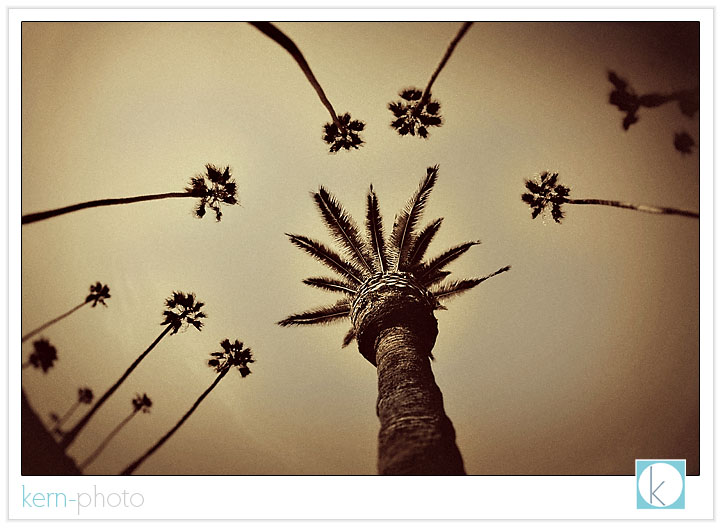
looking up to a pleasant surprise of palm trees is a simple delight :)
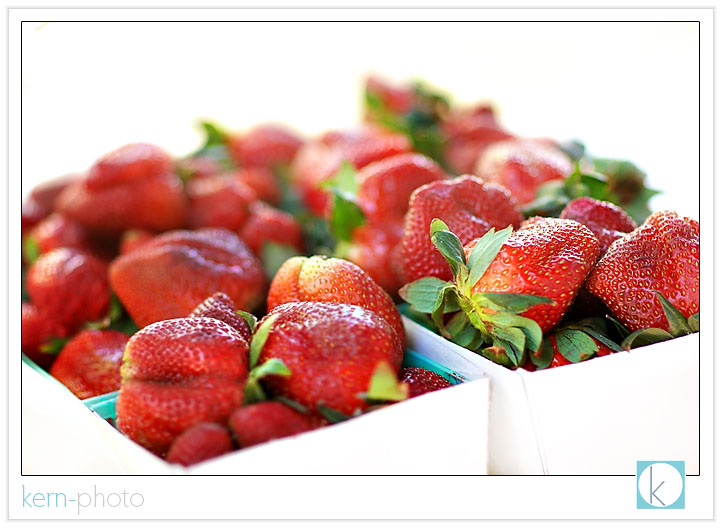
3 pints of locally-grown strawberries for a whopping $6... gone in less than 10 minutes :)
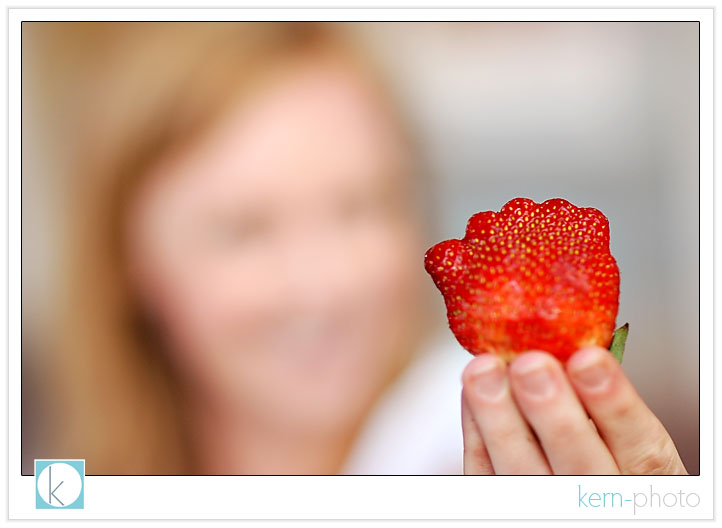
looks like little baby toes :)
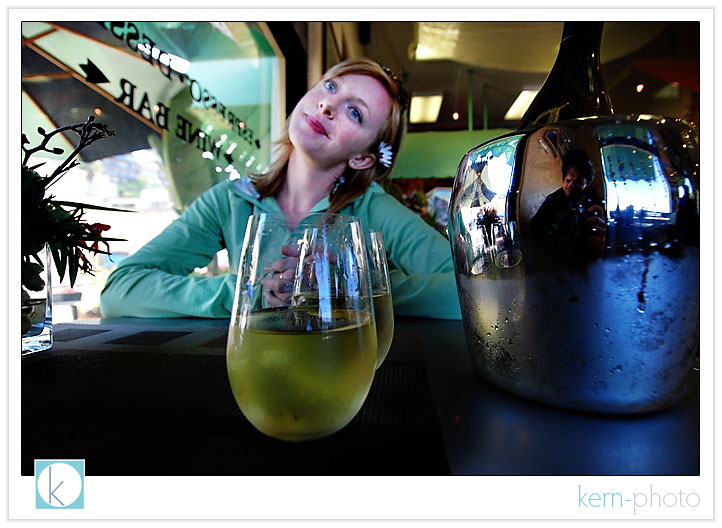
as a special treat, we indulged in a nice bottle of savignon blanc with a super dark flour-less chocolate cake (spot r. j.'s self-portrait in the reflection, too :)
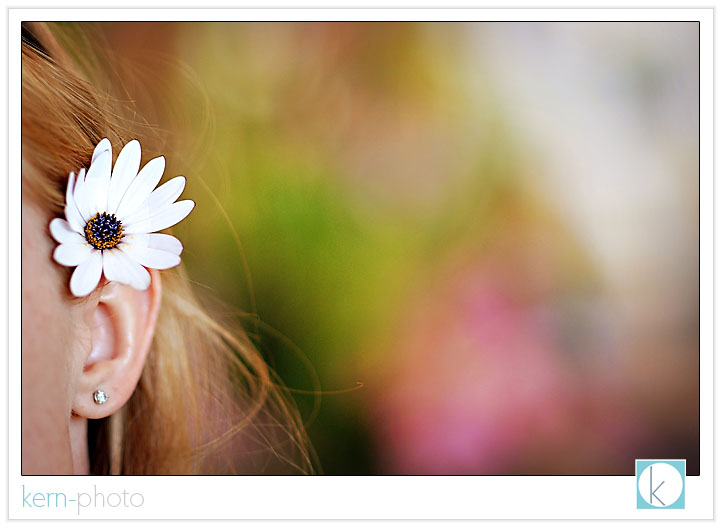
and some of the finer details in life:
this trip we took a few rolls with the holga (a medium format film camera which costs under $30!), our nikon d-80, a few lenses, and no tripod.
given we are photographers, it is surprising to see how little we actually photograph each other (other than cheesy test shots to check if equipment is working properly). however, vacationing is a grand time to experiment with different techniques and photograph for the love of the art. and the best part is we can enjoy the keeper shots and frame for our home :)
this is almost a week's worth of scruff from not shaving... nicole says she spotted gray hair in my facial hair ( i can not call it a beard). yet another sign of approaching 30.
another classic kern-photo self-portrait made with our favorite super wide-angle nikon 12-24 f/4 lens.
there are few gas stations on the island since bikes and golf carts serve as a popular mode transportation.
we liked this prayer:
this random tree in struck our interest. we whipped out our 10.5mm fish-eye lens looked up just before taking this snap:
i fired this shot of nicole to see if a little sb-800 could overpower the sun... mission accomplished using f/13 at 1/200 sec, iso 100 (one sb-800 flash provided the light on nicole, which was set at manual full-power and triggered wirelessly with our nikon d-80 pop-up flash as a commander, such a cool little trick :)
looking up to a pleasant surprise of palm trees is a simple delight :)
3 pints of locally-grown strawberries for a whopping $6... gone in less than 10 minutes :)
looks like little baby toes :)
as a special treat, we indulged in a nice bottle of savignon blanc with a super dark flour-less chocolate cake (spot r. j.'s self-portrait in the reflection, too :)
and some of the finer details in life:
son di-ago :)
03.21.08 | travel &
escapes
after years of saying "son di-ago," it was about
time we visited the world-famous san diego zoo.
if you have no idea what we mean, rent anchorman: the
legend of ron burgundy (2004). the movie
has a funny ending filmed at the zoo.
anyrate, here are a few of our favorite
snaps from our spring break day:
here's seven-month old, 27 lb female giant panda named zhen zhen.

a polar bear yawns with remnants of sweet potatoes.
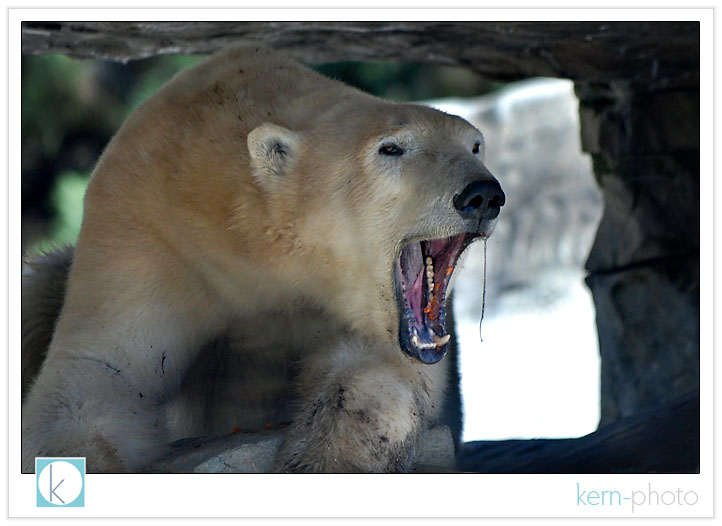
looks fake, but 100% real.
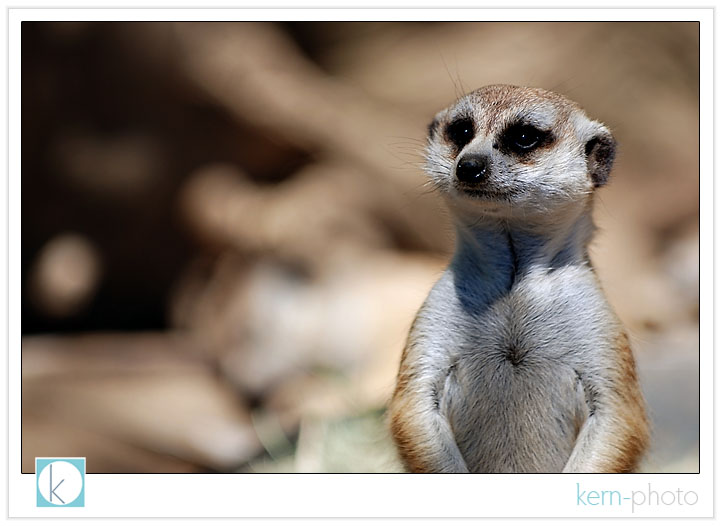
and our favorite, the meerkat!
here's seven-month old, 27 lb female giant panda named zhen zhen.
a polar bear yawns with remnants of sweet potatoes.
looks fake, but 100% real.
and our favorite, the meerkat!
day in l.a.
03.17.08 | travel &
escapes
our first full day of spring break was spent in
los angeles. first stop was a palm sunday visit
at the beautiful cathedral of
our lady of the angels. then we headed
over to the la brea tar pits to
tickle the kid in us. nicole wanted to be a
paleontologist when she grew up. if you've
never been to see the hidden geological
wonder smack dab in the middle of l.a., you
gotta check it. researchers are still
digging up dino bones in goulash tar pits
like this:
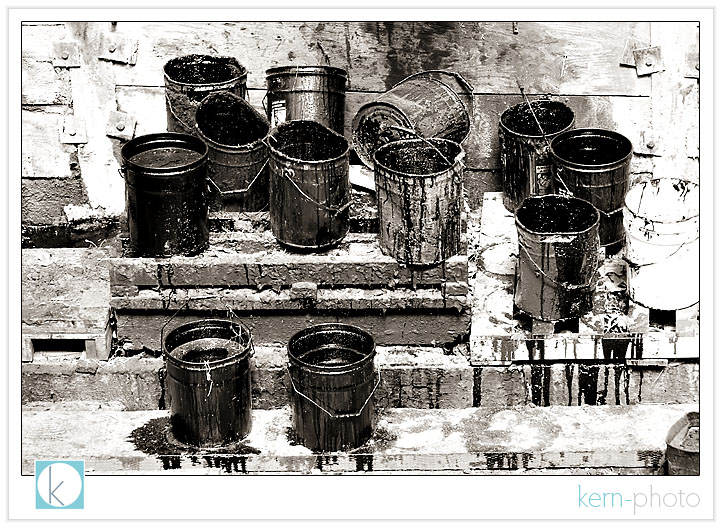
buckets of tar:
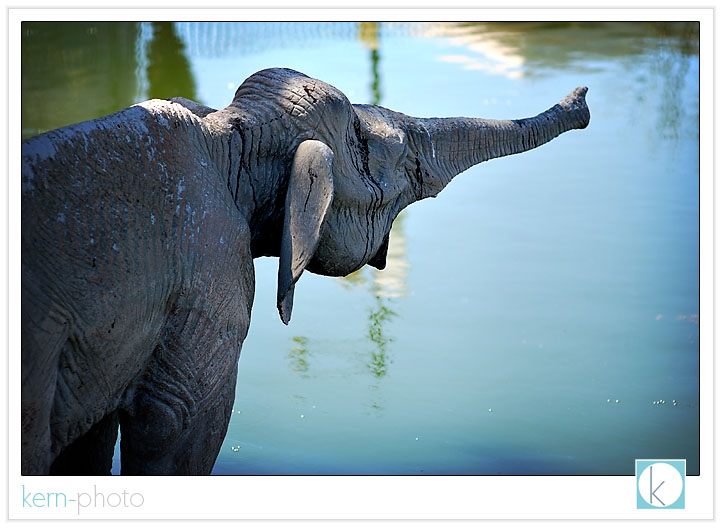
a sad story... a baby elephant screaming for its mom sinking in the tar pits (mind you, it is a statue).
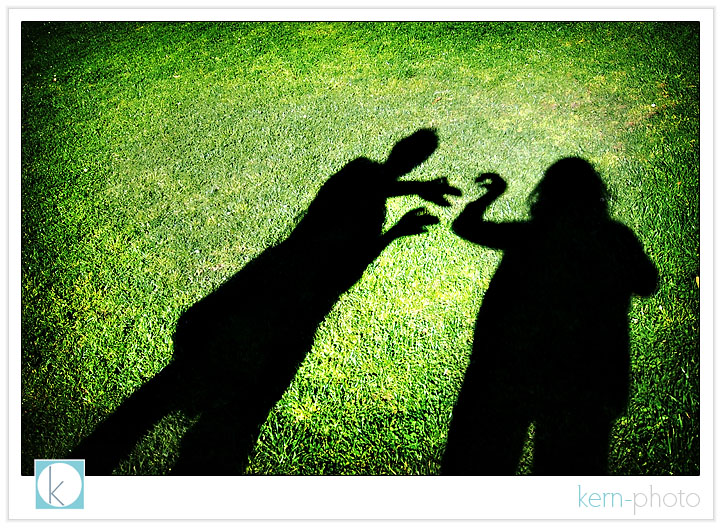
denver got slammed with snow, so we relished the green grass.
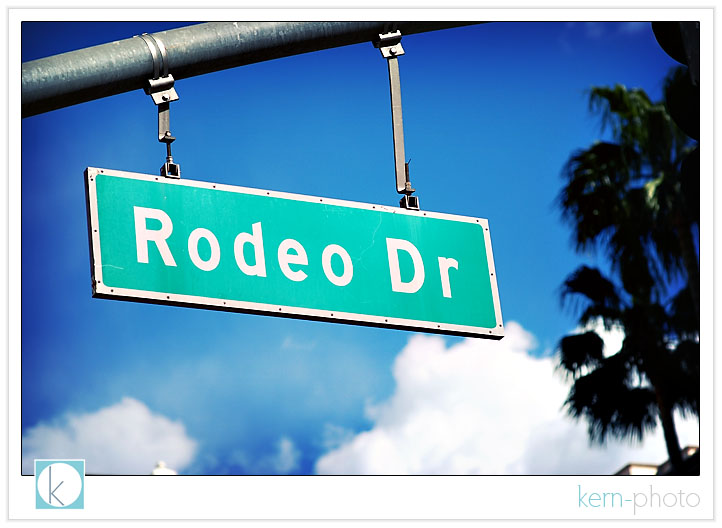
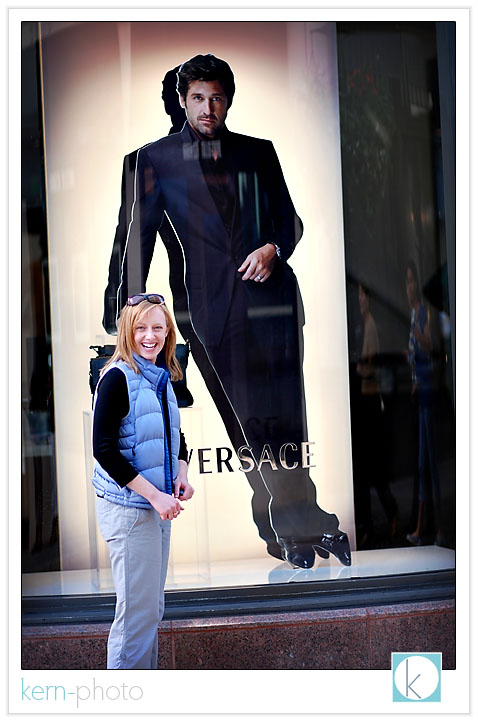
then we headed to rodeo drive in beverly hills to see if we could spot some celebrities.
r. j.'s competition:
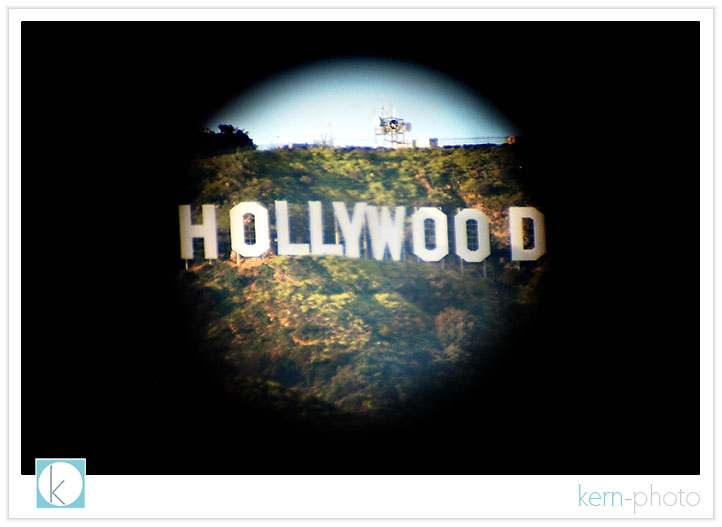
at all cost, we wanted a shot of the notorious hollywood sign. for 25 cents, you can stick your camera in front of huge telescopes and snap this:
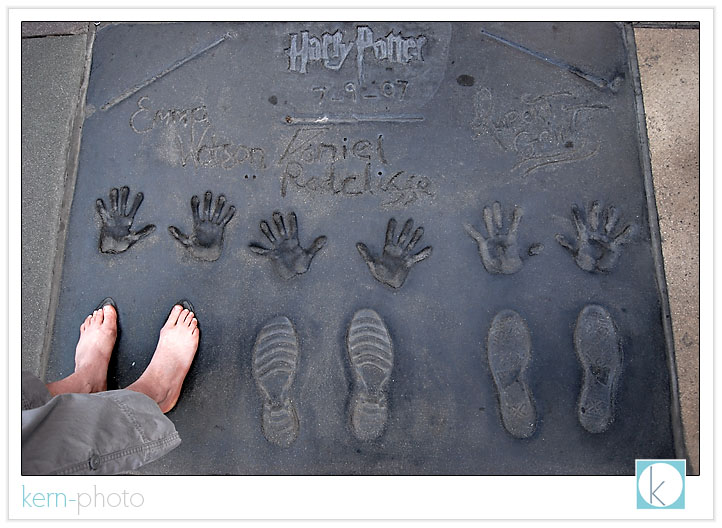
to all of my (nicole) pa school friends out there -- i can now safely say i have stood in the footprints of hermione :) i feel smarter already...
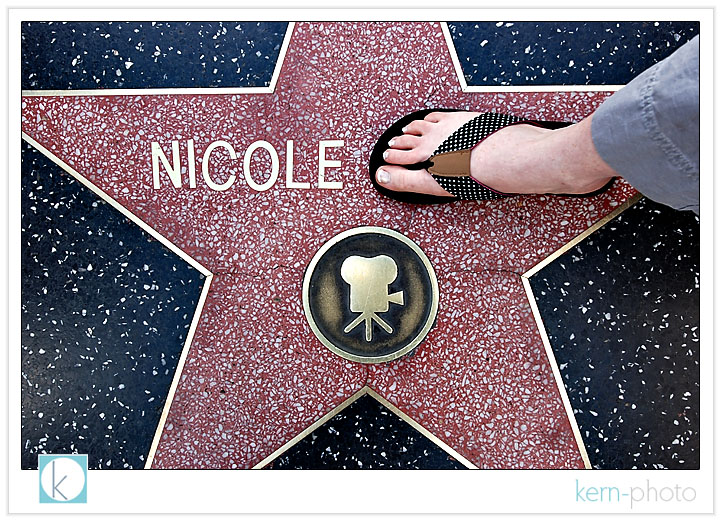
nicole has her own star :)
buckets of tar:
a sad story... a baby elephant screaming for its mom sinking in the tar pits (mind you, it is a statue).
denver got slammed with snow, so we relished the green grass.
then we headed to rodeo drive in beverly hills to see if we could spot some celebrities.
r. j.'s competition:
at all cost, we wanted a shot of the notorious hollywood sign. for 25 cents, you can stick your camera in front of huge telescopes and snap this:
to all of my (nicole) pa school friends out there -- i can now safely say i have stood in the footprints of hermione :) i feel smarter already...
nicole has her own star :)
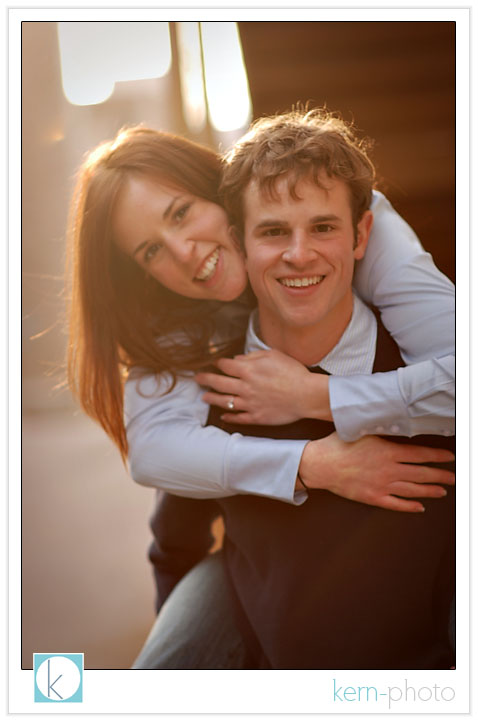
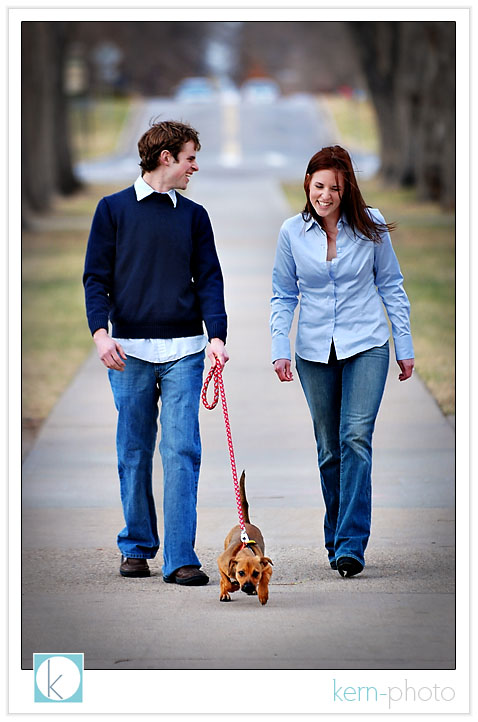
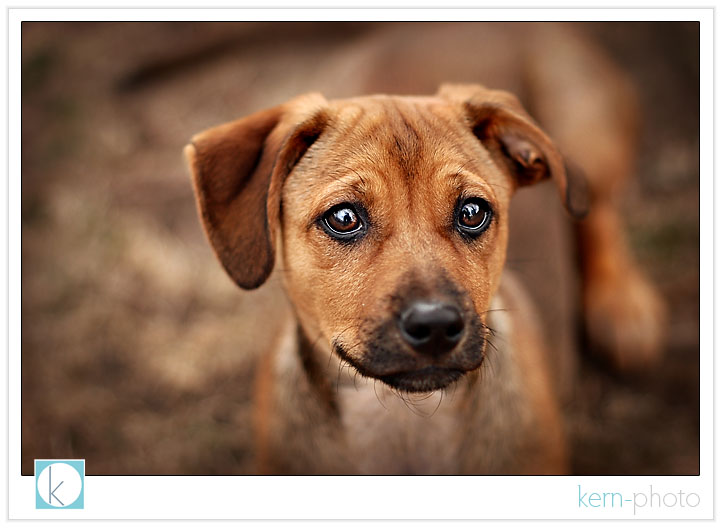
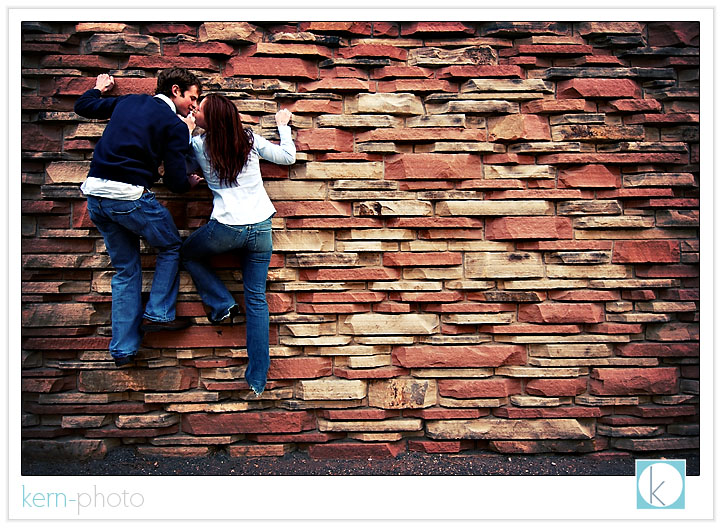
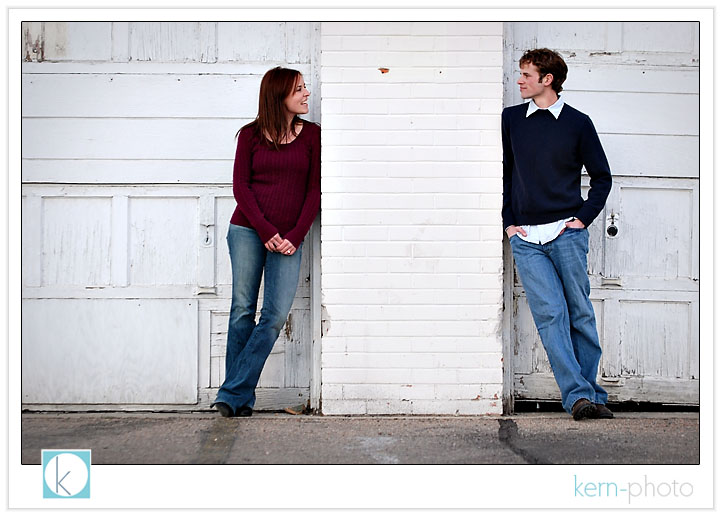
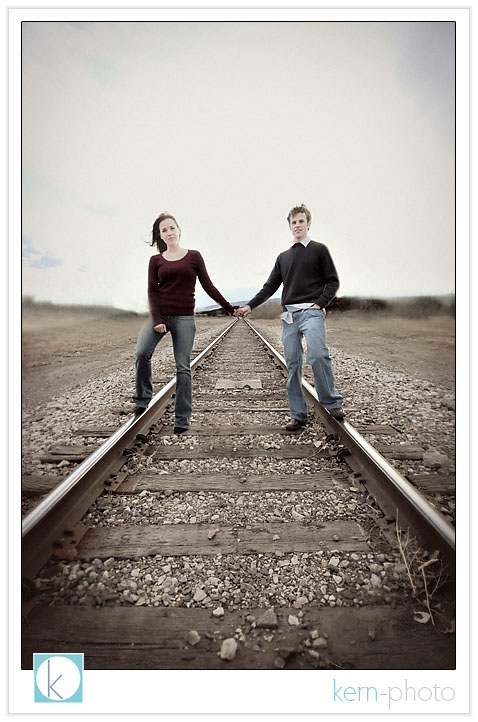
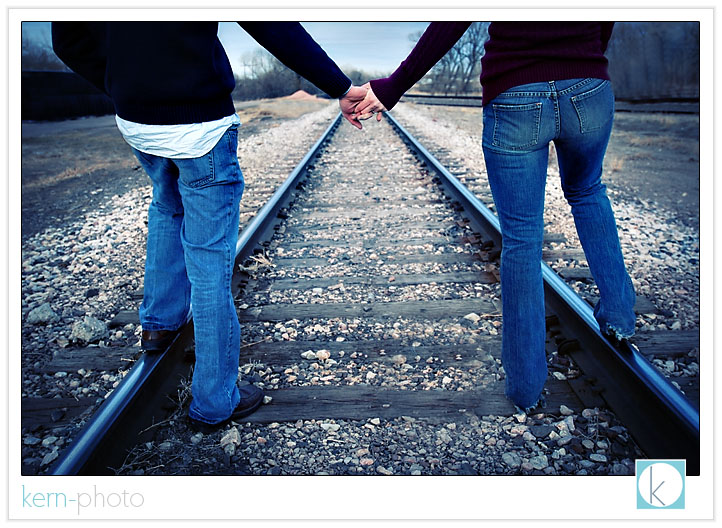
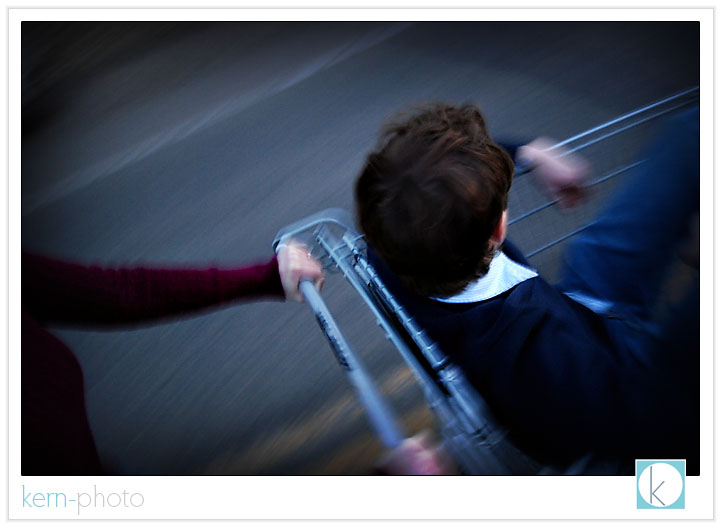
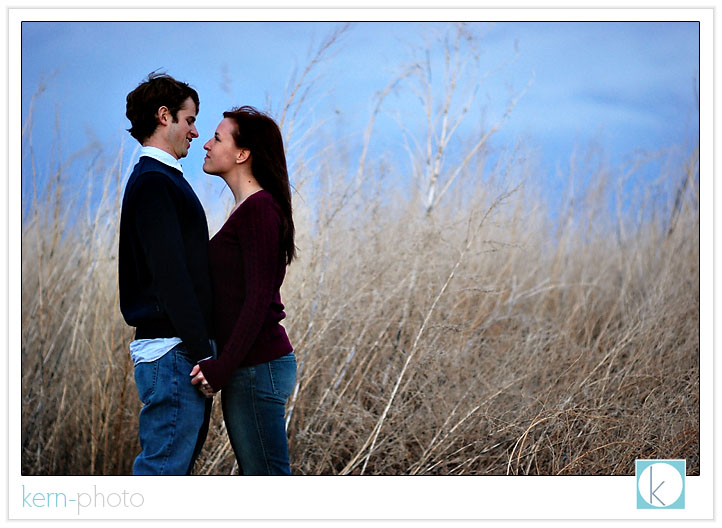
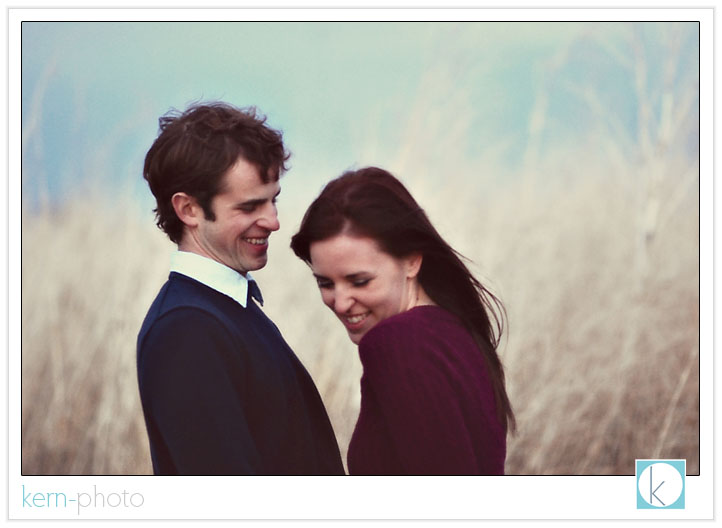
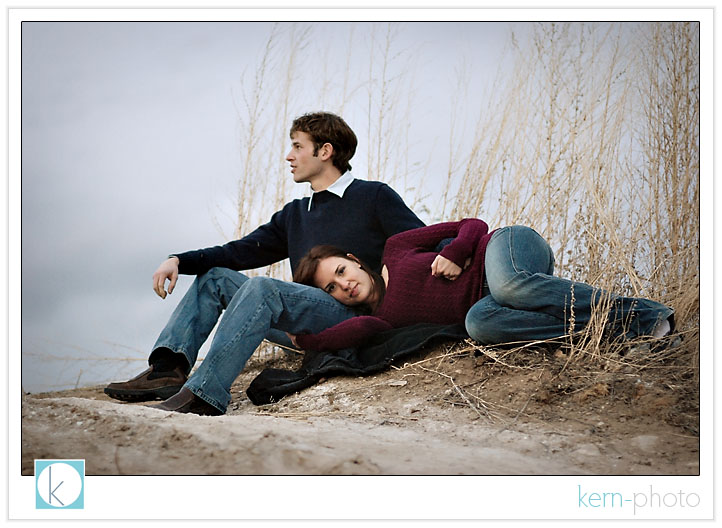
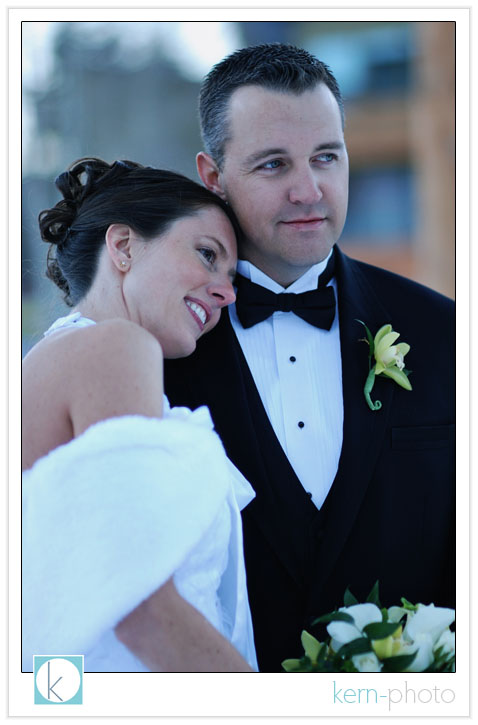
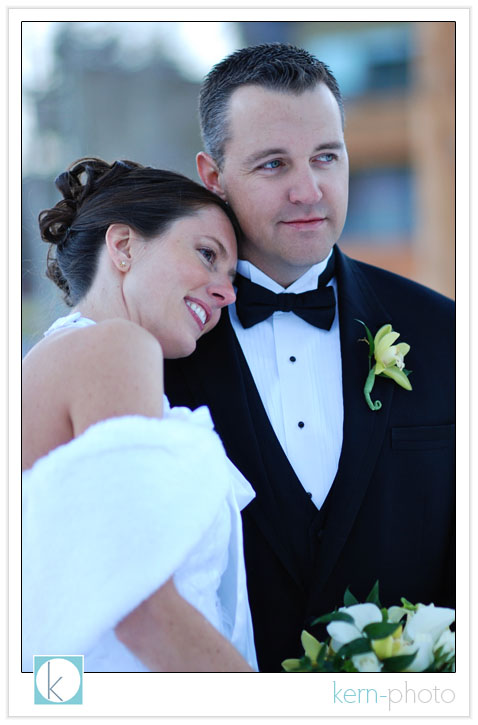
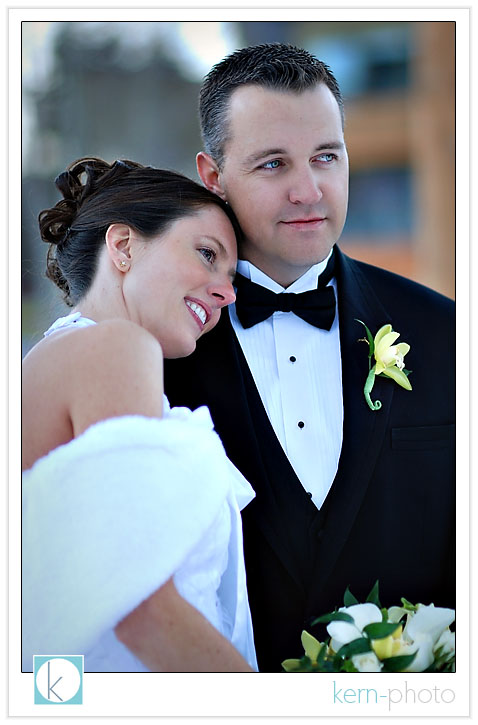
jessica & josh
03.15.08 | engagements
jessica & josh share wonderful chemistry and
i know they are looking forward to their catholic
wedding on october 11 in denver. their new pooch,
lucky, joined in on some of their engagment
session action in fort collins a few days ago.
here are a few of our favorites:
gotta love those puppy eyes :)
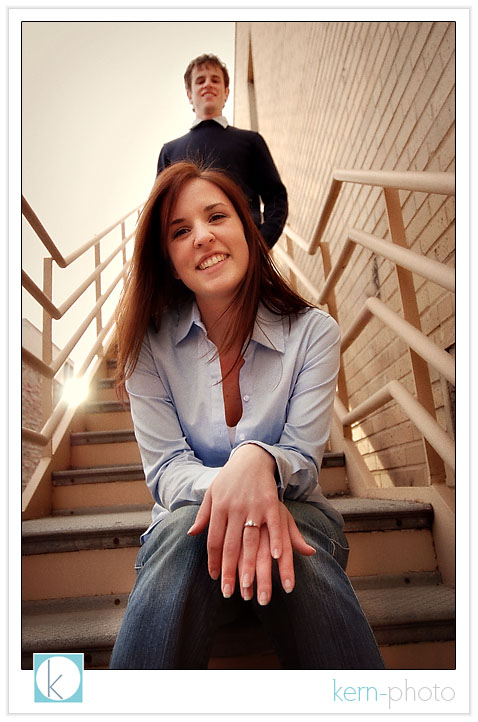
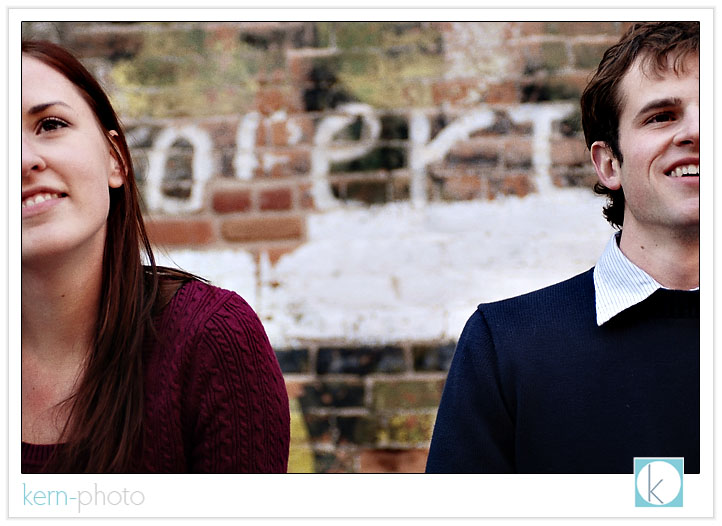
climbing up a wall of academia at colorado state university where they both graduated.
we chased the light for this fun shot in a random staircase on campus:
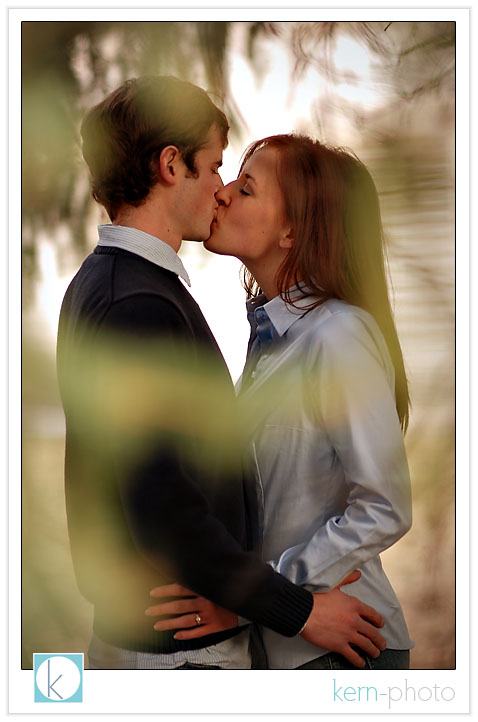
under a tree for a romantic moment.
as the sun was setting, i caught this reflection off a distant building window with our super wide 12-24 f/4 nikon lens.
who says you can't break the rules in a creative portrait?
these were a little creative experiment inspired by a simple shopping cart found on the side of the road, so we thought we'd toss in josh and tool around. here's the trio series:


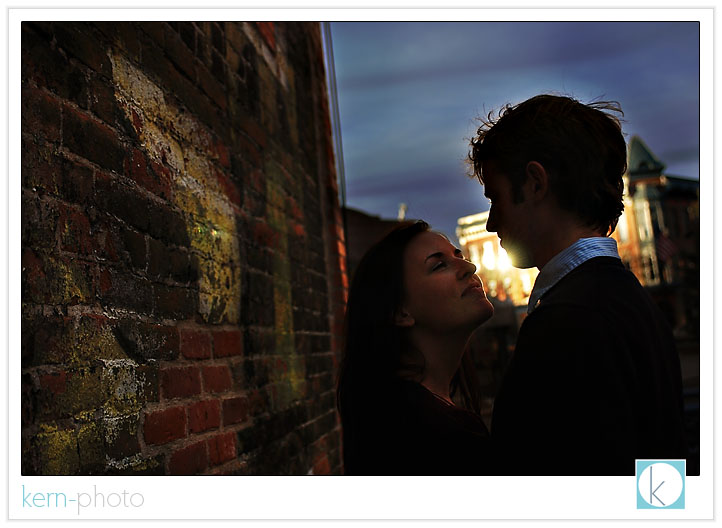
just after sunset we found a random field to explore and catch great diffused light.
an old school taken on a classic moment :)
gotta love those puppy eyes :)
climbing up a wall of academia at colorado state university where they both graduated.
we chased the light for this fun shot in a random staircase on campus:
under a tree for a romantic moment.
as the sun was setting, i caught this reflection off a distant building window with our super wide 12-24 f/4 nikon lens.
who says you can't break the rules in a creative portrait?
these were a little creative experiment inspired by a simple shopping cart found on the side of the road, so we thought we'd toss in josh and tool around. here's the trio series:
just after sunset we found a random field to explore and catch great diffused light.
an old school taken on a classic moment :)
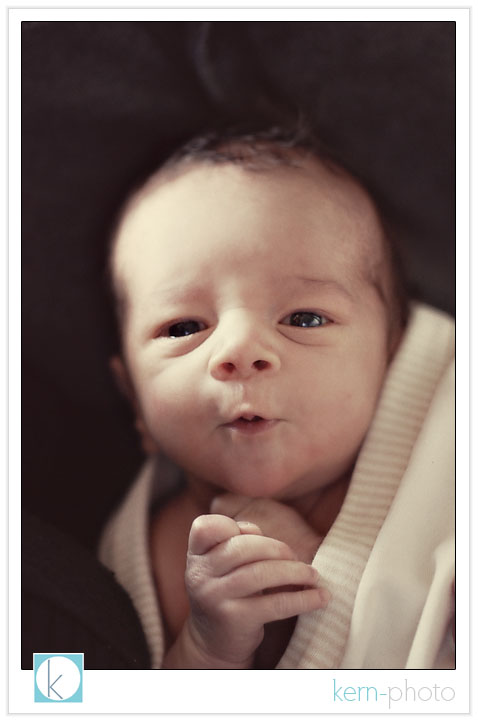
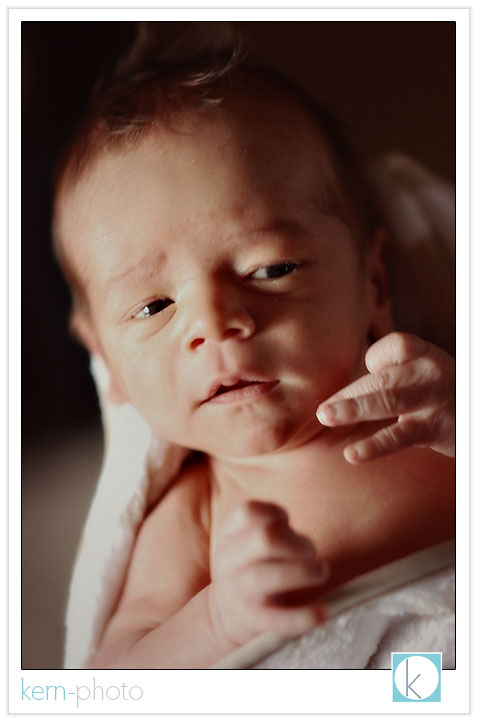
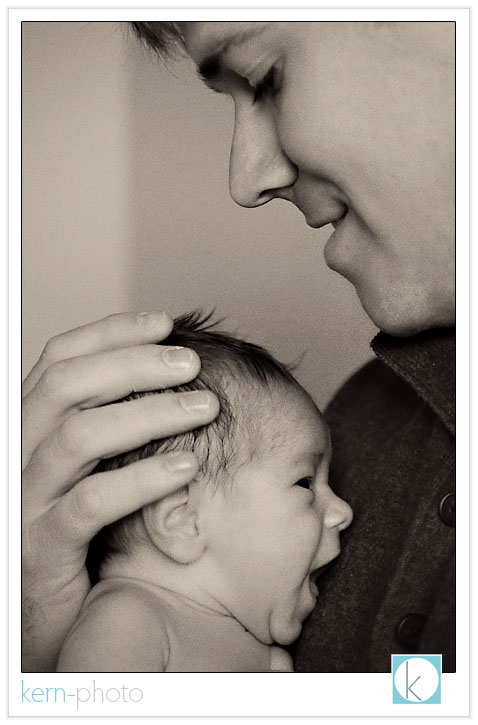
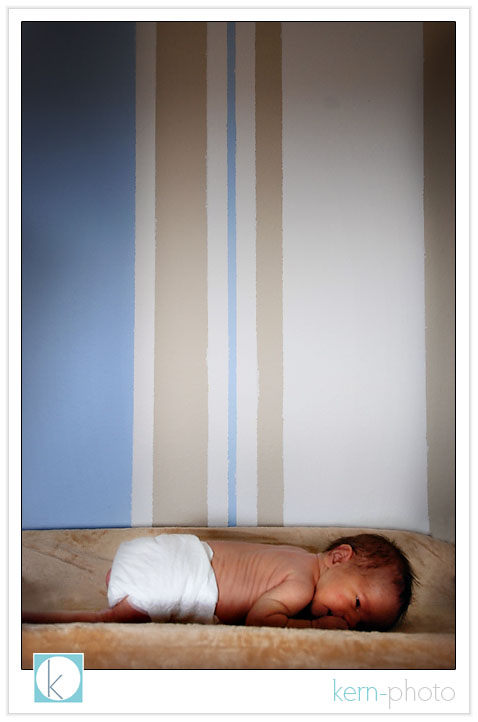
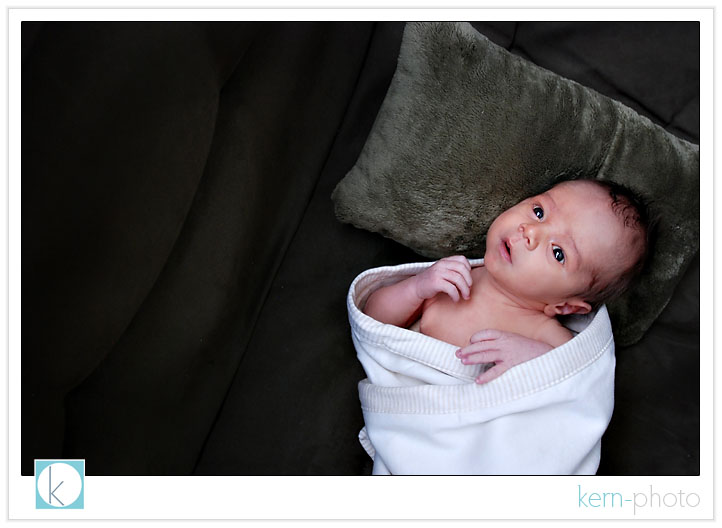
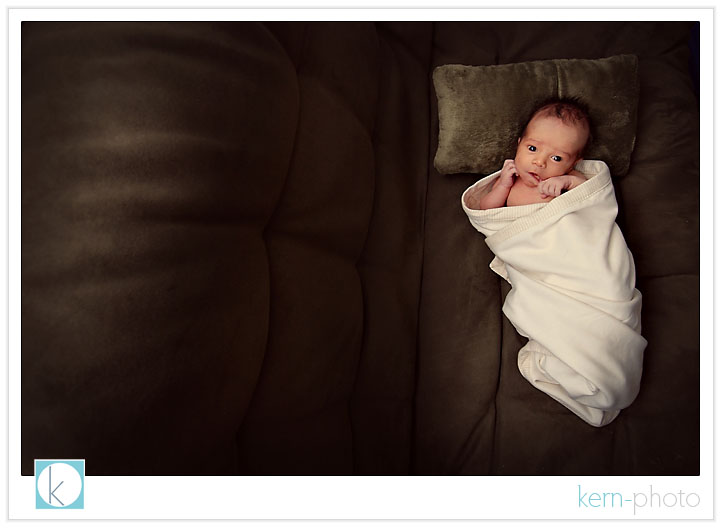
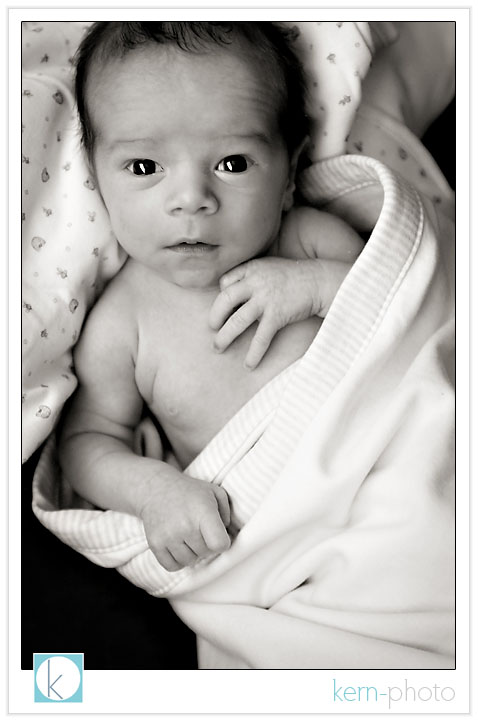
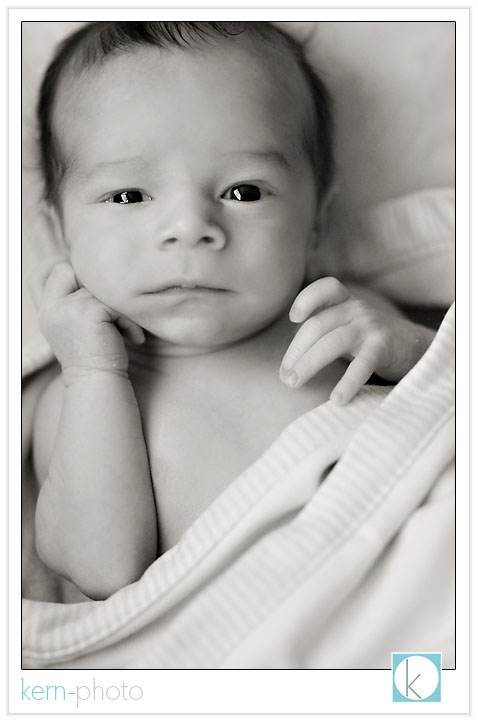
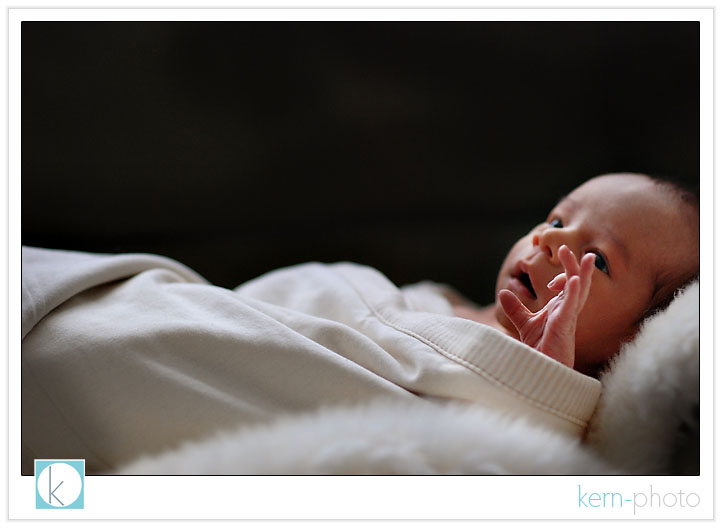
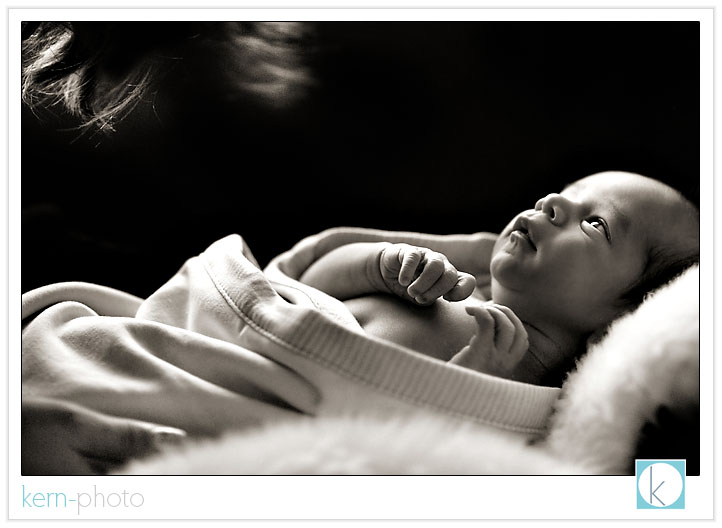
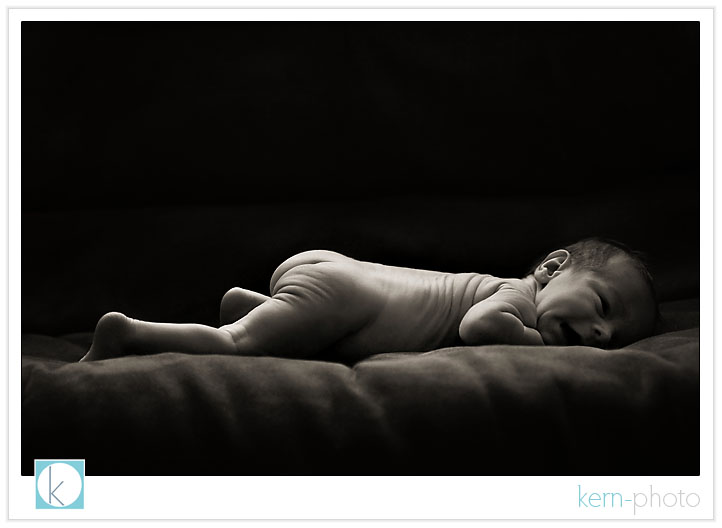
10 days old
03.14.08 | portraits
we shot melissa & drew's wedding early last
summer (click
here to view slideshow) and it was an
honor to shoot their new new addition to
their family, baby boy they named 'breckin.'
"it's the best thing that ever happened to me," melissa says.
and yes, he's named after drew's favorite place, breckenridge, colorado. now, that's our kinda baby name!
meet breckin:
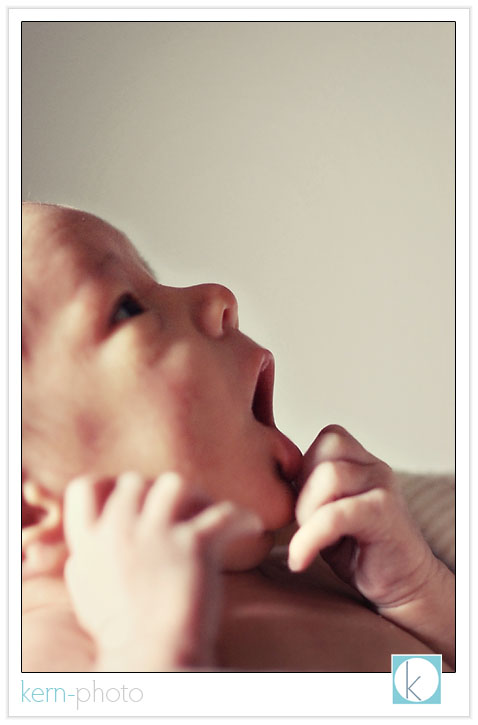
we've been there before :)
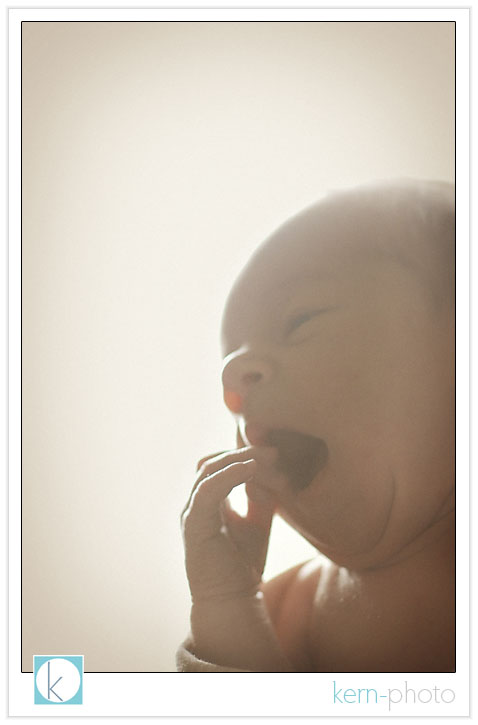
he's a charmer...
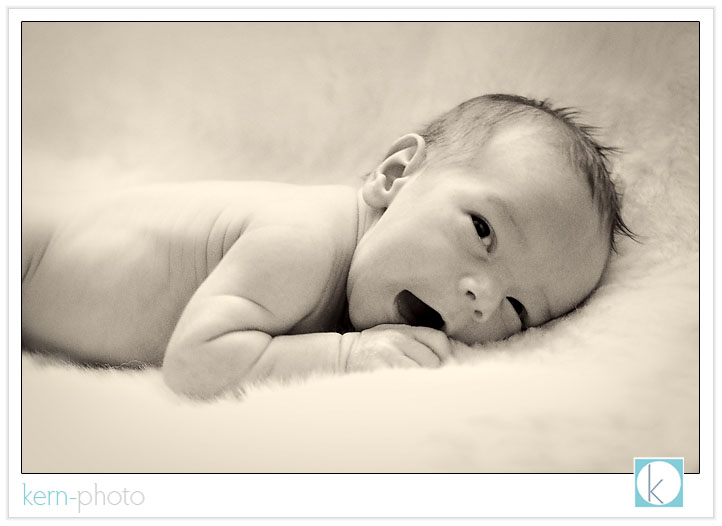
a favorite moment.
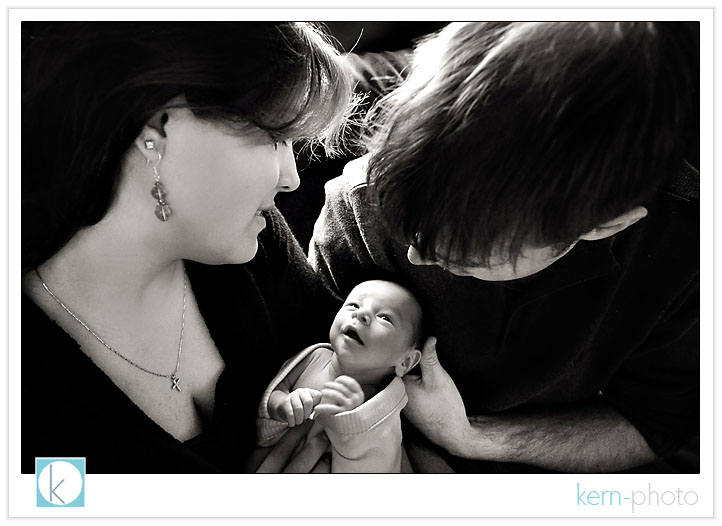
the fingers are found :)
it felt so special being apart of this special time in their life. i know melissa & drew are gonna be a super-star parents.

male bonding:
i wish my walls looked kinda like this :)
lungs of steel.

yes, that would mean 'peace out.'
hands down my favorite shot from our session... melissa's hair featured in the upper left.
we've seen this before, but it is still so frickin' cute.
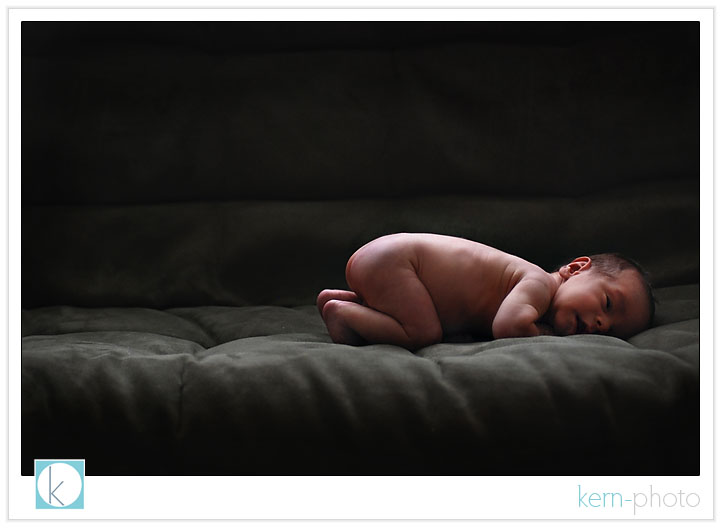
BUTT... we haven't seen this before :) i count over 30 wrinkles....
"it's the best thing that ever happened to me," melissa says.
and yes, he's named after drew's favorite place, breckenridge, colorado. now, that's our kinda baby name!
meet breckin:
we've been there before :)
he's a charmer...
a favorite moment.
the fingers are found :)
it felt so special being apart of this special time in their life. i know melissa & drew are gonna be a super-star parents.
male bonding:
i wish my walls looked kinda like this :)
lungs of steel.
yes, that would mean 'peace out.'
hands down my favorite shot from our session... melissa's hair featured in the upper left.
we've seen this before, but it is still so frickin' cute.
BUTT... we haven't seen this before :) i count over 30 wrinkles....
1931 ford light painting
03.11.08 | colors &
textures - photo-resources
last fall i was topping off gas at costco and met
howard hall who neared completion of 6.5 year
restoration of his 1931 ford victoria (355 chevy
engine with 700 r4 transmission, gulp). just as i
was about to drive off, i noticed he was having
car troubles so i offered to help. it was one of
his maiden voyages and the car wouldn't start. i
felt for him, gave him my card, and offered to
shoot his car just 'cause. he called me a few
months later and took me up on my offer. sunday
night we made guys night all about photos and
cars (and a few beers).
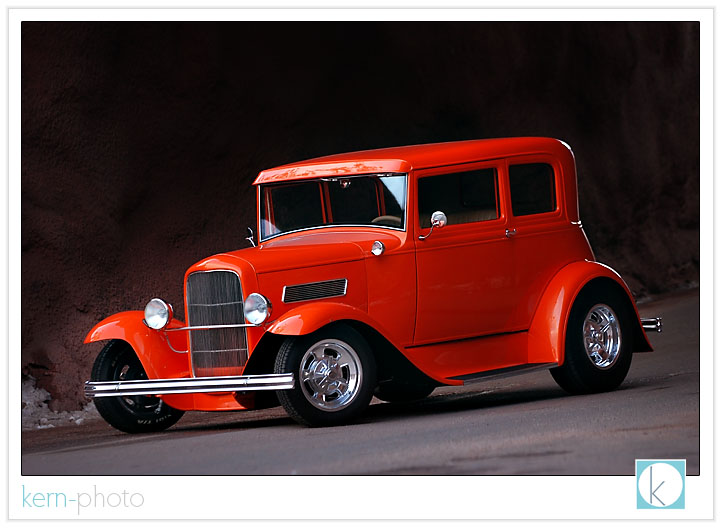
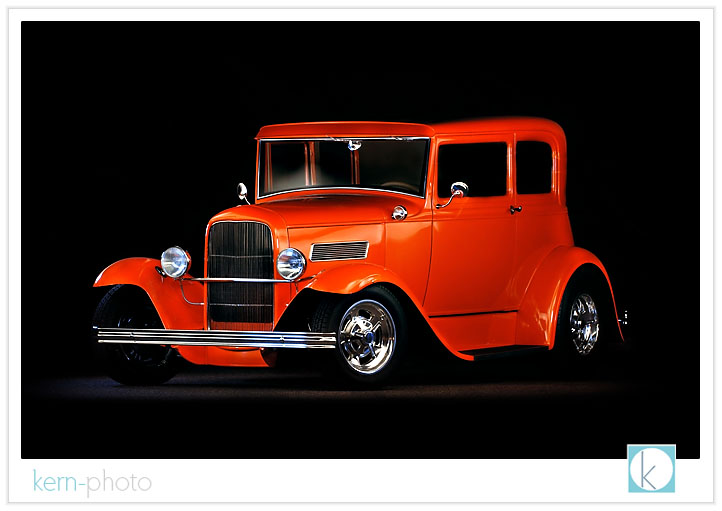
howard's 6.5 years of patience invested in his beautiful restoration shows. gotta love that painted tangelo pearl color, too!
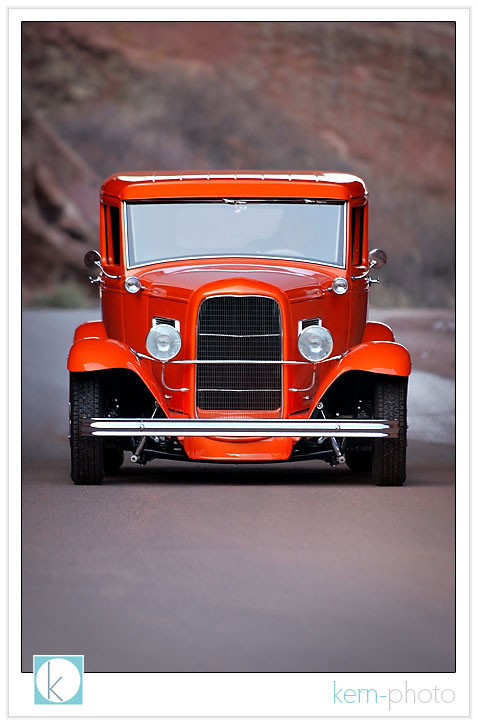
shot in broad daylight in a mini-cave at red rocks amphitheater. photo stats: f/2.8 at 1/125, using a 70-200 at 140mm, ISO 400, handheld
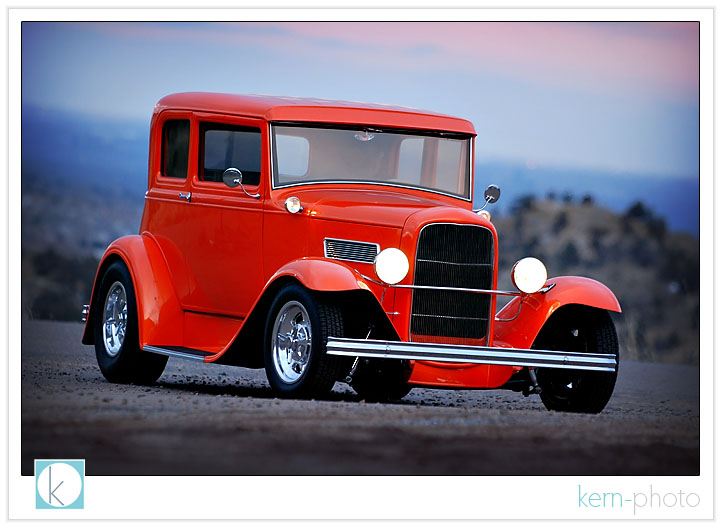
i love the sunset appearance, juxtaposed nicely with the tangelo :)
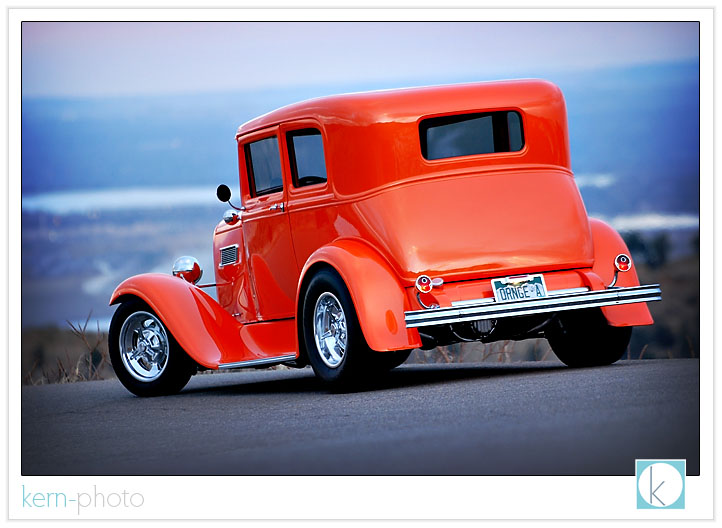
and from the rear, showing off the agressive forward rake (a trait of hot rods in those days :)
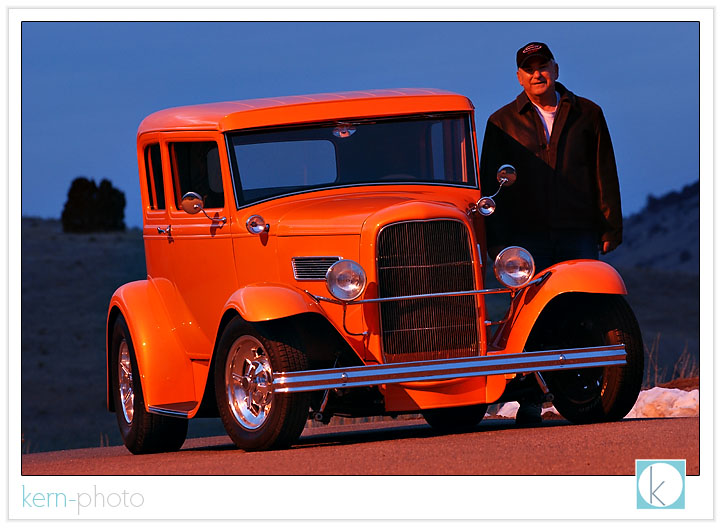
and here's howard with his toy: (shot in broad daylight. f/8 at 2 secs, 200mm, ISO 400, on tripod)
a little artsy shot to spice things up:

then we added a little flash flavor:
the secret formula for the shot above goes something like this: red rocks at night + 1 strobe manually triggered about 8 times + 1 mini soft box for diffusion + nikon d80 at f/13, iso 200 + 30 seconds = our favorite shot. for those inquiring minds, here's the shot straight out of the camera (note remnants of my light painting):
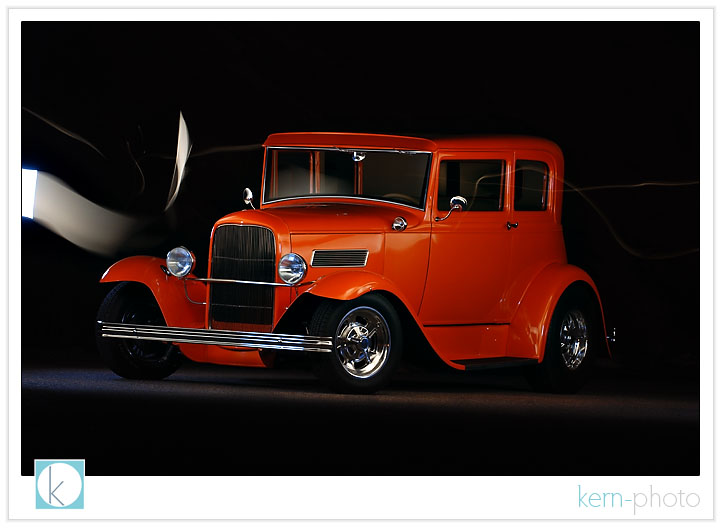
this mini-project also happened to to be #12 on my list of 101 photo goals in 1,001 days. inspiration for the light painting came from the video featured below. if you are interested in getting your car shot, contact us by clicking here.
howard's 6.5 years of patience invested in his beautiful restoration shows. gotta love that painted tangelo pearl color, too!
shot in broad daylight in a mini-cave at red rocks amphitheater. photo stats: f/2.8 at 1/125, using a 70-200 at 140mm, ISO 400, handheld
i love the sunset appearance, juxtaposed nicely with the tangelo :)
and from the rear, showing off the agressive forward rake (a trait of hot rods in those days :)
and here's howard with his toy: (shot in broad daylight. f/8 at 2 secs, 200mm, ISO 400, on tripod)
a little artsy shot to spice things up:
then we added a little flash flavor:
the secret formula for the shot above goes something like this: red rocks at night + 1 strobe manually triggered about 8 times + 1 mini soft box for diffusion + nikon d80 at f/13, iso 200 + 30 seconds = our favorite shot. for those inquiring minds, here's the shot straight out of the camera (note remnants of my light painting):
this mini-project also happened to to be #12 on my list of 101 photo goals in 1,001 days. inspiration for the light painting came from the video featured below. if you are interested in getting your car shot, contact us by clicking here.
101 photogoals in 1,001 days: update #1
03.09.08 | 101 goals
in *light* of the beginning of daylight savings
time (gotta love that extra hour of after-work
play light), i thought it was time for an update
on my 101 photo goals
in 1,001 days. four months have passed
since the goals were published on this blog
and i'm proud to report completion of
24 goals. where possible,
i've included a link for "proof" using
photos and such. here's the updated list:
101 photo goals in 1,001 days
by r. j. kern on november 11, 2007 [updated on 3.14.08]
1. photograph my wife in her wedding dress [12.30.07, proof]
2. book 101 referrals
3. exhibit in the cherry creek arts festival
4. shoot a celebrity wedding
5. complete our wedding album
6. shoot landscapes with ken rockwell
7. get an image published in a book
8. get placed on three preferred wedding vendor lists (1/3)
9. photograph ten national parks i’ve never been to
10. blog everyday for a month three times (1/3)
11. photograph all 12 original chrysler 300 letter cars and create a calendar
12. lightpaint a car [03.09.08, proof]
13. get to know the work of 25 dead photographers
14. get to know the work of 50 active photographers
15. present at a pictage user group meeting [03.06.08, proof]
16. photograph my brother's wedding with my wife [12.29.07, proof]
17. invest 30% of our buisness income
18. donate 20% of total income in the way of a services-in-kind to a charity
19. launch a fine art project website
20. finish my seed pod personal project
21. read one book per month for six months to benefit our photo business (4/6)
22. give away the books to benefit someone else (1/6)
23. second shoot at a wedding for someone i admire
24. resist the urge to buy some expensive camera equipment and do something important with the money instead
25. shoot with a nikon 200mm f/2g if-ed af-s vr lens
26. shoot with a nikon 200-400mm f/4g if-ed, af-s vr zoom-nikkor lens
27. purchase nikon 85mm f/1.4 if af lens, one of nikon’s finest lenses and a bokeh champ [11.19.07, proof]
28. take at least one new business workshop from score in denver
29. have coffee with someone business-related i don't know very well once a month for six months (3/?)
30. become involved in a toastmasters group in denver
31. launch portrait photography website
32. learn to make pie from my wife then photograph the result and see if you can tell the difference
33. grow our business by 200% each year (1/3)
34. shoot a medium format camera [02.19.08]
35. teach a photography class (x2) [01.24.08, 02.21.08, proof]
36. write and produce at 3 tutorial articles to help other photographers (1/3)
37. create a signature marketing piece [02.19.08, proof]
38. print and mail signature marketing piece [03.01.08, proof]
39. write a piece for a magazine, paper, or journal
40. give another vendor a complete wedding album for free [12.20.07]
41. photograph muscian(s) for album cover art
42. photograph u2 in concert
43. build our portrait photography business by doing two location shoots per month for six months in a row (8/12)
44. go on an african photo safari
45. photograph sashi & alex
46. get a studio
47. shoot a wedding at our church, the cathedral basilica of the immaculate conception
48. do something creativity different on each shoot
49. build a photo resources portion of our website [03.07.08, proof]
50. build a bridal resources portion of our website [03.07.08, proof]
51. send out birthday cards to all clients
52. learn to whistle with two fingers (rounding up those huge groups)
53. become a nikon pro
54. photograph a denver broncos game (with sideline credentials)
55. photograph at least one of every major professional denver sports team (with sideline credentials)
56. shoot 100,001 shutter actuations from my d-200
57. shoot 300,000 photos
58. photograph a u.s. president
59. learn a different style of photography [03.03.08, proof]
60. create a series of custom photoshop actions [03.04.08]
61. learn to use a large format camera
62. make a book of personal travel & art photos
63. make a book of just dash photos
64. win the lindsay designs photo contest 3 years in a row (2/3)
65. host an osp trash the dress session with other photographers
66. take an advanced studio lighting class
67. become involved in a professional photographic organization
68. post three tutorial videos on cutframe aimed at helping other wedding photographers
69. complete a personal abc project (60% completed)
70. speak at partner con
71. shoot production stills for a major motion picture
72. go to the annual wppi conference
73. enter a photo in wppi print competition
74. win a photo wppi award
75. speak at wppi
76. donate a wedding package in which 100% of proceeds would benefit a charity
77. get an image published in patagonia catalog
78. shoot a portrait with a soft box [02.13.08, proof]
79. figure out how jessica claire makes her images look so freakin' good [02.15.08]
80. get in touch with at least two early art mentors (1/2)
81. shoot with a ringflash [02.15.08, proof]
82. volunteer for a week in a foreign country
83. take a vacation and not bring a camera
84. travel to a new place with one prime lens and no flash [01.22.08, proof]
85. shoot a destination wedding
86. encourage or mentor an upcoming photographer [02.20.08]
87. meet wedding photography heroes mike colon, david jay, [b]ecker, joe bussink, jessica claire, john michael cooper, and nate & jaclyn kaiser
88. shoot a wedding in 3 new countries
89. shoot a wedding on another continent
90. form three new partnerships with another company
91. help another vendor book a referral event [02.10.08]
92. inspire someone to pick up photography as a hobby [01.06.08]
93. inspire a fellow photographer to blog
94. become a member of the wedding photojournalist association
95. become a member of the artistic guild of the wedding photojournalist association
96. win a top 10 award in the wpja contest, individual category
97. develop a few exposed rolls of b&w film that have been sitting in my desk drawer for years [03.03.08]
98. be listed as one of the top photographers in the wedding photojournalist association
99. qualify as one of the top 10 artistic photojournalists in the world
100. refer a wedding to a new photographer [02.24.08]
101. finish, post, and share this list [11.11.07, proof]
tips for interior design photography
03.08.08 | photo-resources
armed with lighting techniques proselytized by
the strobist,
we think of interior design photography as a
natural blend between landscape and portrait
photography. architectural and interior design
photography is something that is rather new for
us. in all reality, techniques are similar which
include nailing exposure with multiple off-camera
flashes, diffusing light, balancing various color
temperatures, and most importantly, working fast
with minimal equipment.
many of the images found in expensive interior design catalogs are created by photographers using large studios and tons of lighting equipment to mimic the look of natural light. however, when photographing the interior of homes, one may still accomplish a similar look with a minimal footprint.
key ingredients to obtaining simple, clean interior design lighting include using a sturdy tripod and learning to use flash to light interiors. with proper tools, you can shoot with little ambient light and still create an image that looks creatively different. striving to keep it simple and do more with less, here are our top ten tips to photograph interior design and architecture:
10. hide lights with a small tripod. we like the cheap 6-8 inch ones because the small footprint makes them easier to conceal.
9. higher ISOs give flashes more power. 400 seems to work well.
8. think about sharpness and depth of field. you probably knew that, however if you stop down too much, say to f/22, you risk diffraction (bending of light) that can lead to softer images. using a 12mm lens on digital body (18mm on film camera) you do not have to be stop down as much to obtain a workable depth of field than say that of a 50mm lens. if you want an extreme shallow depth of field good for isolating details, shoot wide open (f/1.4) with a medium telephone lens (like in the range of 85mm to 200mm) and move close to your subject. getting close to your subject to further decrease depth of field.
7. diffuse your flash. don't go for the deer in the headlights look which will result in harsh light with deep shadows. experiment by using a small softbox or umbrella bounced against a white wall, which can create wonderful, clean light.
6. bounce light off of a wall. if possible, the wall bounce creates a much larger apparent light source and yields softer shadows. a little light source from a small flash head will create harder light. a bigger light source bounced off a wall will yield softer light, similar to that of a soft-box. when you walk into a room, look for walls that may not show up in the photo.... those will be perfect for bouncing.
5. gel your flashes. save time in post-processing by balancing your light temperatures in-camera. for example, if you are shooting a room with incandescent ambient light, use an orange gel on your flash and change your camera's white balance to incandescent (the one that looks like a light bulb). this will trick the camera and will make your flash and the ambient light look the same shade of white. read your owner's manual to learn more. experiment using blue gels and mixing up the in-camera white balance for some creative effects.
4. avoid color casts. if you bounce off a blue wall, expect your light to be cool and blue. bounce off a red wall, expect the bounced light to be unnaturally warm. also, expect to use more power in rooms with dark walls and ceilings, since the light won't be bounced around as much.
3. start small first. if you’re accustomed to shooting with one on-camera light, the best way to ease into shooting with off-camera lights is to start small. try a small bedroom, turn off your on-camera light and use only the remote one, placed a few feet away and bounced off the wall, to get used to the idea. then discover tricks of “hiding” the light source from the camera like under a table or behind a big chair. then, add in the on-camera light with a diffuser for fill.
2. place off-camera strobes a foot taller than furniture. this creates a more natural feeling for lighting and shadows and can closely mimic window light. bouncing off the ceiling creates a less-natural effect, kind of like the ceiling is one giant room-sized skylight.
1. expose for the exterior. start with ambient-only exposure and meter manually. this means if you want to make the light outside the window appear natural, you may need increase exposure time to 2 or 3 seconds if you are shooting at twilight or to 1/60th if want to make the light outside the white "blown-out" window look like daylight. the next step is to use your off-camera lighting (strobes or flashes) to bring the interior or main subject to a similar exposure level. do not be afraid to chimp to see if your effect is working. while it may seem counter intuitive to expose the outside light first, by doing so, you allow for far greater lighting freedom of your subject.
ps- triggering lights via the wireless nikon and canon setups can be problematic as the signals will not bend around corners, as they are line-of-sight only. radio triggers like pocketwizards or other brands of radio slaves are generally far more reliable.
extra credit: one of the most difficult concepts for first timers to wrap their head around is this: shutter speed will control the windows/ambient light and aperture will control the strobes. this same philosophy may be applied to many different styles of photography.
teri carr at atmosphere homestyle proudly displays some of her interior design work. teri invited me last week to photograph some of her interior design work. as part of our time together, i shared with her some of our lighting tricks. we also produced a small body of photographs for her interior design portfolio.

here, a small flash with an umbrella was bounced off a wall to the right. notice the outside light closely matches with the inside light. in addition, a orange gel was placed over the flash to balance the incandescent light from the lamps. camera wb set to incandescent.
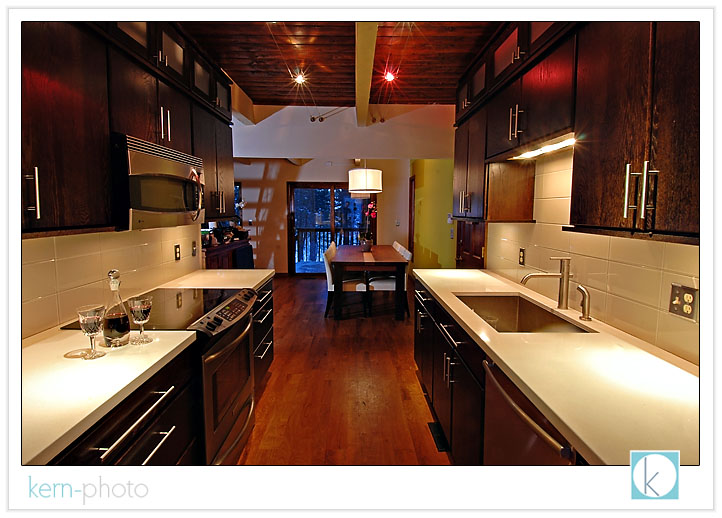
this shot was taken with a tripod with 3 second exposure and a flash triggered remotely around the corner to make the green wall pop in the background. notice the stairwell shadow in the background and shadows cast by the chairs at the table. our nikon 12-24 f/4 lens was used to capture the wide-angle of the kitchen.
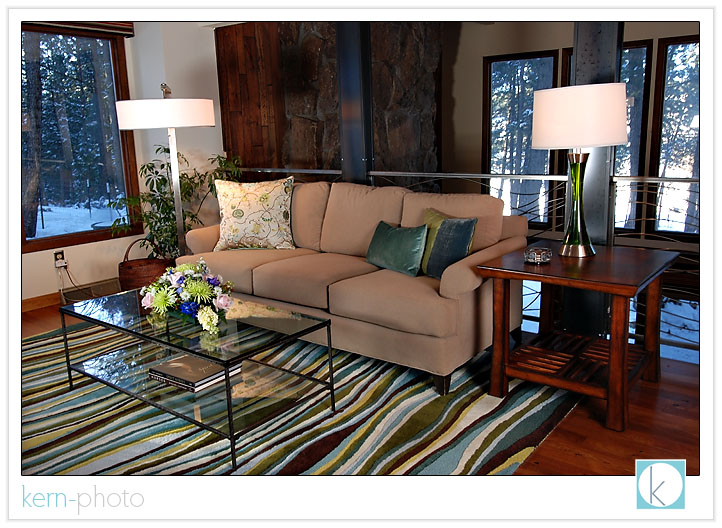
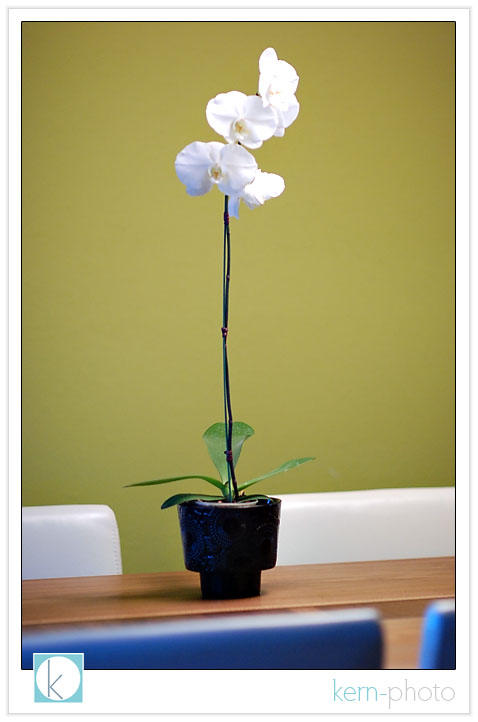
a flash isn't always necessary to use inside. this shot was taken with no flash and no tripod using only available light found in an overhead fixture. we like the simplicity of the green background and the single white orchid.
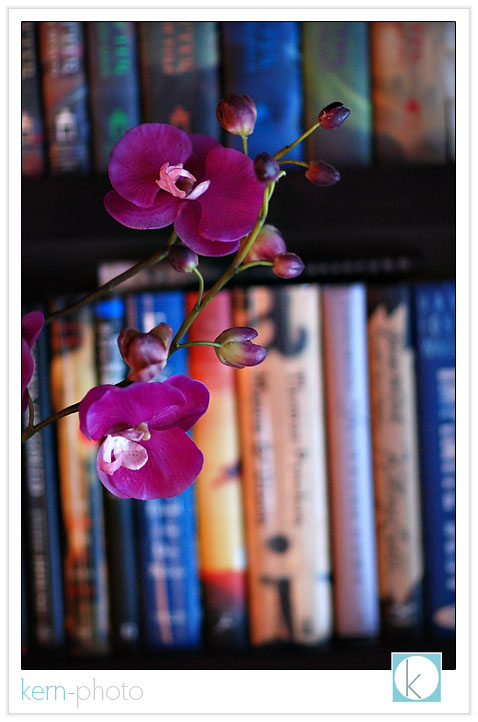
using shallow depth of field (f/1.4 on an 85mm lens) makes it easier to blur out the background of this flower lit from a north-facing window to the camera right.
one of the nice perks to interior photography is the comfort of being warm and dry, a pleasant perk compared to landscape photography our soul and gear are up against rain, snow, and wind :)
many of the images found in expensive interior design catalogs are created by photographers using large studios and tons of lighting equipment to mimic the look of natural light. however, when photographing the interior of homes, one may still accomplish a similar look with a minimal footprint.
key ingredients to obtaining simple, clean interior design lighting include using a sturdy tripod and learning to use flash to light interiors. with proper tools, you can shoot with little ambient light and still create an image that looks creatively different. striving to keep it simple and do more with less, here are our top ten tips to photograph interior design and architecture:
10. hide lights with a small tripod. we like the cheap 6-8 inch ones because the small footprint makes them easier to conceal.
9. higher ISOs give flashes more power. 400 seems to work well.
8. think about sharpness and depth of field. you probably knew that, however if you stop down too much, say to f/22, you risk diffraction (bending of light) that can lead to softer images. using a 12mm lens on digital body (18mm on film camera) you do not have to be stop down as much to obtain a workable depth of field than say that of a 50mm lens. if you want an extreme shallow depth of field good for isolating details, shoot wide open (f/1.4) with a medium telephone lens (like in the range of 85mm to 200mm) and move close to your subject. getting close to your subject to further decrease depth of field.
7. diffuse your flash. don't go for the deer in the headlights look which will result in harsh light with deep shadows. experiment by using a small softbox or umbrella bounced against a white wall, which can create wonderful, clean light.
6. bounce light off of a wall. if possible, the wall bounce creates a much larger apparent light source and yields softer shadows. a little light source from a small flash head will create harder light. a bigger light source bounced off a wall will yield softer light, similar to that of a soft-box. when you walk into a room, look for walls that may not show up in the photo.... those will be perfect for bouncing.
5. gel your flashes. save time in post-processing by balancing your light temperatures in-camera. for example, if you are shooting a room with incandescent ambient light, use an orange gel on your flash and change your camera's white balance to incandescent (the one that looks like a light bulb). this will trick the camera and will make your flash and the ambient light look the same shade of white. read your owner's manual to learn more. experiment using blue gels and mixing up the in-camera white balance for some creative effects.
4. avoid color casts. if you bounce off a blue wall, expect your light to be cool and blue. bounce off a red wall, expect the bounced light to be unnaturally warm. also, expect to use more power in rooms with dark walls and ceilings, since the light won't be bounced around as much.
3. start small first. if you’re accustomed to shooting with one on-camera light, the best way to ease into shooting with off-camera lights is to start small. try a small bedroom, turn off your on-camera light and use only the remote one, placed a few feet away and bounced off the wall, to get used to the idea. then discover tricks of “hiding” the light source from the camera like under a table or behind a big chair. then, add in the on-camera light with a diffuser for fill.
2. place off-camera strobes a foot taller than furniture. this creates a more natural feeling for lighting and shadows and can closely mimic window light. bouncing off the ceiling creates a less-natural effect, kind of like the ceiling is one giant room-sized skylight.
1. expose for the exterior. start with ambient-only exposure and meter manually. this means if you want to make the light outside the window appear natural, you may need increase exposure time to 2 or 3 seconds if you are shooting at twilight or to 1/60th if want to make the light outside the white "blown-out" window look like daylight. the next step is to use your off-camera lighting (strobes or flashes) to bring the interior or main subject to a similar exposure level. do not be afraid to chimp to see if your effect is working. while it may seem counter intuitive to expose the outside light first, by doing so, you allow for far greater lighting freedom of your subject.
ps- triggering lights via the wireless nikon and canon setups can be problematic as the signals will not bend around corners, as they are line-of-sight only. radio triggers like pocketwizards or other brands of radio slaves are generally far more reliable.
extra credit: one of the most difficult concepts for first timers to wrap their head around is this: shutter speed will control the windows/ambient light and aperture will control the strobes. this same philosophy may be applied to many different styles of photography.
teri carr at atmosphere homestyle proudly displays some of her interior design work. teri invited me last week to photograph some of her interior design work. as part of our time together, i shared with her some of our lighting tricks. we also produced a small body of photographs for her interior design portfolio.
here, a small flash with an umbrella was bounced off a wall to the right. notice the outside light closely matches with the inside light. in addition, a orange gel was placed over the flash to balance the incandescent light from the lamps. camera wb set to incandescent.
this shot was taken with a tripod with 3 second exposure and a flash triggered remotely around the corner to make the green wall pop in the background. notice the stairwell shadow in the background and shadows cast by the chairs at the table. our nikon 12-24 f/4 lens was used to capture the wide-angle of the kitchen.
a flash isn't always necessary to use inside. this shot was taken with no flash and no tripod using only available light found in an overhead fixture. we like the simplicity of the green background and the single white orchid.
using shallow depth of field (f/1.4 on an 85mm lens) makes it easier to blur out the background of this flower lit from a north-facing window to the camera right.
one of the nice perks to interior photography is the comfort of being warm and dry, a pleasant perk compared to landscape photography our soul and gear are up against rain, snow, and wind :)
jump for joy!
03.04.08 | dash, our
mascot!
we had a good laugh when we saw dash's
tooshie pop up in our inbox. we've got a
mini-project in the works with the fine
folks over at pattern &
paw. while we can't tell you much, if
you are interested in letting us shoot your
dog (we're looking for small and medium
sized dogs), please contact
us. as an added perk, you'll just might
get free pattern &
paw shwag in return :)
CLICK HERE for the coolest dog (& cat) collars on the planet and save 23% today only. enter coupon code: "Sweet23" to get the discount. ps- pattern & paw has never offered this big of a discount, so act now, supplies are limited, batteries not included...

CLICK HERE for the coolest dog (& cat) collars on the planet and save 23% today only. enter coupon code: "Sweet23" to get the discount. ps- pattern & paw has never offered this big of a discount, so act now, supplies are limited, batteries not included...
slobberface
03.03.08 | dash, our
mascot!
[b] school on iTunes
03.02.08 | photo-resources
hey, photographers, if you haven't yet seen
becker's quick tips featured on iTunes,
they are awesome. becker has spent a good
bit of time building these little short
episodes illustrating behind-the-scenes [b]
magic of how his biz flows. this is another
example of why we love wedding photography
2.0: the sharing of knowledge and paying it
forward.

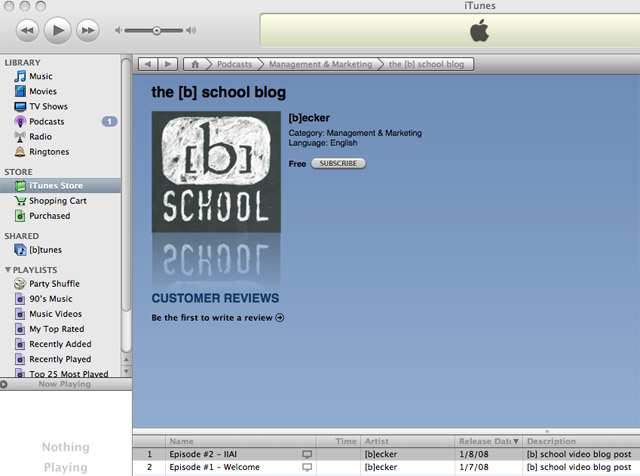

CLICK HERE TO AUTOMATICALLY SUBSCRIBE TO THIS PODCAST ON ITUNES
(iTunes must be already installed on your computer)
CLICK HERE TO AUTOMATICALLY SUBSCRIBE TO THIS PODCAST ON ITUNES
(iTunes must be already installed on your computer)
how we process digital negatives
03.01.08 | bridal-resources
- photo-resources
back
in the days of film photography, the negative was
the starting point for a good photograph. a good
negative was important for a good print, but the
photographer had to work 'darkroom magic' to
ensure the final print was worth hanging. these
skills often took years of practice to perfect. a
good print often relied upon 'behind-the-scene'
techniques like re-touching dust specs, selective
lighting (dodging) or darkening (burning),
contrast adjustment, sharpening, and cropping.
these techniques allowed the photographer to
create an image reflecting his/her creative
intention just before the shutter was clicked.
with digital photography, while the technical processes of picture-taking hasn't changed much, but the workflow has. just because a photo is taken, doesn't mean it is ready for printing. our creative post-processing techniques are an important component of our 'fresh. modern. fun.' style. any final print undergoes scrutiny before headed to the printer. that means stray hair removal, minor blemish retouching, contrast-adjustment, color-correction, sharpening, etc are all completed before a final print is made.
each image is different and requires a different artistic touch to refine. similar to food, if you put the same amount of salt on every dish, sometimes it might taste better, while other times it might taste awful. same goes with photography. we take care in every print to ensure it represents our best work. not everyone 'gets' digital photography, so we wanted to share a little bit of the behind-the-scenes magic of what makes your kern-photo print special.
vivid, sharp, bright images is what we love... and there is potential in every photo to bring out the best. however, we have a few tricks to really make the images pop. apart of our digital workflow helps streamline the process. we start with a digital 'raw' negative (step 1.) which becomes a corrected proof (step 2.) before a print-ready image (step 3). when you receive your digital negatives, they will be in the corrected proof stage (step 2). if you order prints from us, rest assured you'll get images that meets (step 3) the kern-photo highest standards.
stay tuned for a more in depth look at how we use the latest photoshop technology (adobe cs3) and custom built processing techniques (actions) to obtain our signature look.
but for now, here are a few examples of the general steps taken to process an image:
step 1. the digital 'raw' negative (straight out of the camera)
step 2. the corrected proof (color-corrected, exposure increased, contrast added)
step 3. the final print-ready image (skin re-touched, a bit of warming, eye-pop, and magic sharpening)
step 1. the digital 'raw' negative (straight out of the camera)
step 2. the corrected proof (color-corrected, slight contrast added)
step 3. the final print-ready image (skin re-touched, eye-pop, a bit of warmth, and magic sharpening)

step 1. the digital 'raw' negative (straight out of the camera)
step 2. the corrected proof (color-corrected, slight contrast added)
step 3. the final print-ready image (skin re-touched, eye-pop, and magic sharpening)
with digital photography, while the technical processes of picture-taking hasn't changed much, but the workflow has. just because a photo is taken, doesn't mean it is ready for printing. our creative post-processing techniques are an important component of our 'fresh. modern. fun.' style. any final print undergoes scrutiny before headed to the printer. that means stray hair removal, minor blemish retouching, contrast-adjustment, color-correction, sharpening, etc are all completed before a final print is made.
each image is different and requires a different artistic touch to refine. similar to food, if you put the same amount of salt on every dish, sometimes it might taste better, while other times it might taste awful. same goes with photography. we take care in every print to ensure it represents our best work. not everyone 'gets' digital photography, so we wanted to share a little bit of the behind-the-scenes magic of what makes your kern-photo print special.
vivid, sharp, bright images is what we love... and there is potential in every photo to bring out the best. however, we have a few tricks to really make the images pop. apart of our digital workflow helps streamline the process. we start with a digital 'raw' negative (step 1.) which becomes a corrected proof (step 2.) before a print-ready image (step 3). when you receive your digital negatives, they will be in the corrected proof stage (step 2). if you order prints from us, rest assured you'll get images that meets (step 3) the kern-photo highest standards.
stay tuned for a more in depth look at how we use the latest photoshop technology (adobe cs3) and custom built processing techniques (actions) to obtain our signature look.
but for now, here are a few examples of the general steps taken to process an image:
step 1. the digital 'raw' negative (straight out of the camera)
step 2. the corrected proof (color-corrected, exposure increased, contrast added)
step 3. the final print-ready image (skin re-touched, a bit of warming, eye-pop, and magic sharpening)
step 1. the digital 'raw' negative (straight out of the camera)
step 2. the corrected proof (color-corrected, slight contrast added)
step 3. the final print-ready image (skin re-touched, eye-pop, a bit of warmth, and magic sharpening)
step 1. the digital 'raw' negative (straight out of the camera)
step 2. the corrected proof (color-corrected, slight contrast added)
step 3. the final print-ready image (skin re-touched, eye-pop, and magic sharpening)