
radiopopper p1 review
05.11.08 | photo-resources

*PHOTO GEEK-ALERT*
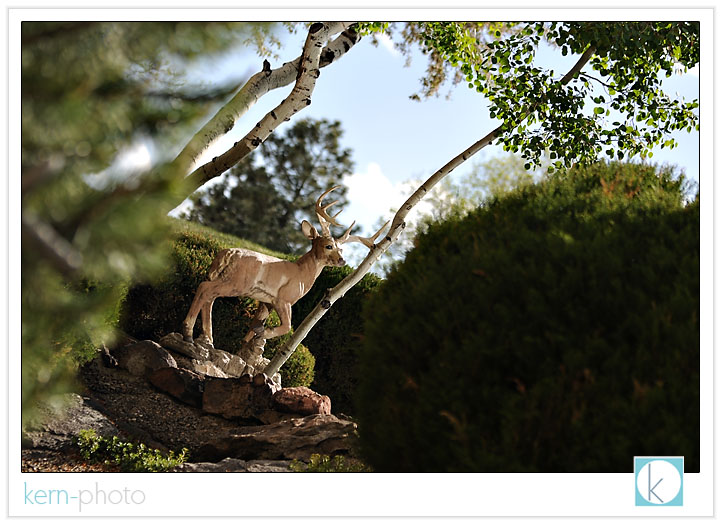
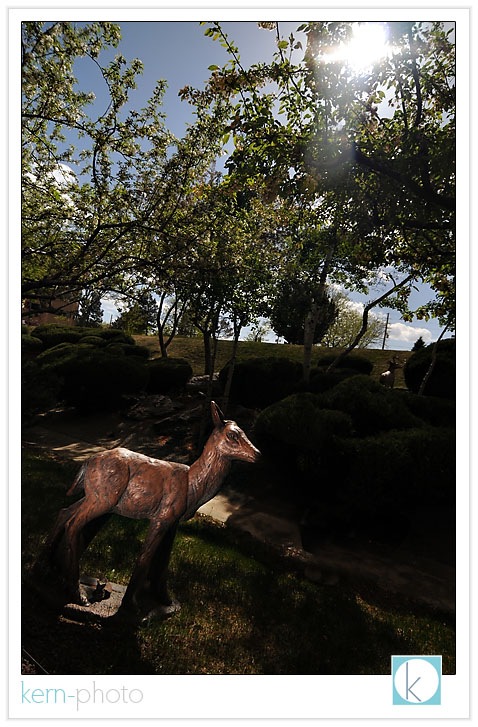
while the deer pictured above is totally fake, the 1/3000 of a second flash-sync used in this shot is totally real. this is among the first shots taken with the new radiopoppers p1, which now greatly extends wireless "through the lens" (ttl) metering (i-ttl for nikon or e-ttl for canon) capability to wireless triggering using radio signals.
radiopoppers take the road more traveled by using radio signals to transmit a wireless "fire now" signal as opposed to infrared technology. infrared triggering for flashes can be unreliable because the line-of-sight signal can be blocked by a tree, person, or a hopping grasshopper.
the basic idea behind ttl is that the flash on the camera talkings to the off-camera flash and tells it how much power to output. tiny pulses of light emitted nano-seconds before the photo is used to survey the scene to determine "proper" exposure. this functionality is able to work regardless if the camera-strobe is told to "not fire," which has no effect on exposure.
check out more radiopopper reviews at the bottom of this page here. and if you want to read more specifics about the p1 system and installation guidelines, head over to radiopopper and sleuth out the published owner's manual and Installation video (Quicktime, 6 min, 14Mb). btw, i am not endorsed by radiopoppers and this review simply serves as my first impression of these new creative lighting tools.
as always, read your owner's manual. i actually enjoyed the warmth and humanity of the writing tone in the owner's manual, far better than most manuals written for direct translation into three dozen languages.
this review also highlights the usefulness of high-speed shutter sync when used in wireless off-camera flash situations. before the dawn of the poppers, this functionality was available only with nikon i-ttl and canon's e-ttl wireless flashes that were either: 1) positioned on-camera, 2) tethered by a ttl cord, or 3) utilize infrared technology. the downfall about the infrared is the moment your line of sight is broken, the flash doesn't receive the trigger signal from the camera and the flash fails to fire. i have had countless exposures where this happens which is totally annoying. however, using radio technology, the communication lines have opened up far greater wireless i-ttl metering options now thanks to radiopoppers. party on.
here are a few initial observations:
PROS:
+ high-speed, reliable wireless flash sync up to 1/8000 sec. not just, wow. but, WOW!
+ no misfires, yet. they fired around corners, behind vegetation reliably, shot after shot after shot. they even fired through concrete walls with no windows at a distance of about 200 feet. there is absoutely no way the current line-up of wireless ttl flashes on the market can do that out of the box.
+ simple setup and ease of use.
+ slightly shorter set-up times will help in complicated lighting conditions.
+ we pay so much for the lenses with good bokeh to use wide open at apertures such as f/2/.8 or f/1.4, why should we have to stop down to f/5.6 and loose the "pretty" foreground/background bokeh? one reason of the whole shebang about using shallow-depth of field lenses is it is easier to isolate the subject by causing the background to have a soft focus appeal. now we can.
+ i intend to use the radiopoppers like pocketwizards (or any other brand of radio slaves) for triggering small speedlight flashes, but with the added benefit of not having to walk over to each slave to change the power output. this is HUGE. this means i can change power either from in-camera or a camera-mounted flash with its own output turned off. this is especially useful if my small flash is on top of a wedding dj's speaker at the reception and i don't want to make an appearance through the dance floor en route to change settings :)
+ if you want to use ttl functionality with ratios and different lighting groups, you can do so from the camera or on-camera flash.
+ the simple design is refreshing to see in a tech world (sorry, equipment measurbators). it has two buttons.
+ "cross-platform" adaptable. this means they play well with both canon and nikon equipment.
+ takes AA batteries.
+ good customer service and support (online, email, and phone). i got a call from kevin king himself ensuring order accuracy. thanks, kev.
+ it is cool to be different.
CONS:
- $360 for one transmitter and one receiver. gulp. evolution has a price, you could say.
- ttl is not that smart, especially when you're lighting only a small portion of your photo. ttl flashes evaluate the entire scene, sometimes dark or light backgrounds will make them guess wrong. you can dial up or down the flash exposure compensation to your taste (be the boss over your metering, not your camera!!). that is where the spin-the-dial-with-an-edumacated-guess-and-see-what-works method of trial/error via chimping is useful. i prefer to set the output of each of the slaves manually. the new perk is now i can make changes using the camera in my hand instead of walking over to each flash unit.
- a screwdriver is required to change the batteries.
- some disassembly required to store properly store flash and radiopoppers in camera bag securely. (i.e. unscrewing the antennas). similar prep-time with pocketwizards and their cords.
- limited supplies as of now. they are taking pre-order shipments only and the rest i waited 6 weeks after ordering it to get it in the mail).
- no pc-sync cord to trigger powerful studio strobes (keep your pocketwizards). however, the radiopopper jr. seems enticing for only $25, coming late summer.
SET-UP:
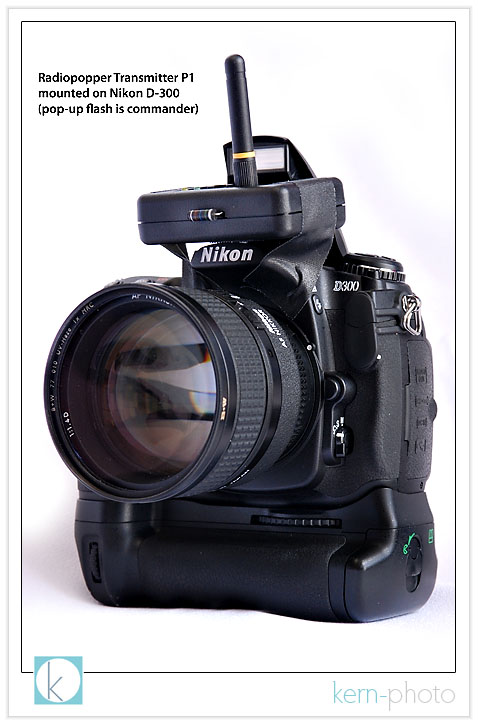
less is more, especially when it comes to lugging around camera gear. that's why i wasn't super excited about using my radiopoppers mounted on a speedlight mounted on a camera. too heavy. a well-balanced camera is very important to me, as i shoot without a camera strap. the vertical grip used with a 70-200 f/2.8 lens balances the camera nicely front to back. however, mount an sb-800 AND a radiopopper and you've added more weight in a different direction, making the camera harder to hold.
that's another reason i dig the pop-up flashes is because they can serve as a commander to other off-camera speedlights. if you got it, why not use it?
and that is exactly what i did with during my initial testing. no problems encountered :)
why else would someone want a big speedlight flash (turned-off) on the camera just to trigger another flash? doesn't that defeat the purpose of an "off-camera" flash?
the preferred option is using some sort of hot-shoe mounted bracket to adhere the radiopopper to such as gary fong's puffer pop-up flash diffuser, which has a hotshoe mount with a nice spot for velcro to adhere the transmitter. this should provide a nice solution when i quickly and easily remove the transmitter (like mid-ceremony in stealth mode... i don't want to hear the velcro rip). plus, who wants velcro or tape on their camera?
here's the skinny on instructions on how to "macgyver" your own mount using the puffer.
the radiopopper p1 transmitter actually fits into the pop-up flash nicely in between the nikon d-300 and the in-camera flash. in testing, the radiopoppers worked fine using the nikon d-300, d-200, d-80, and d-70 in-camera flash. i opt to turn the camera flash "off"
ok, i agree. a cheap piece of tape on a $3,000 camera outfit might seem foolish... but realize this was simply a temporary solution and experiment for the purpose of this review.
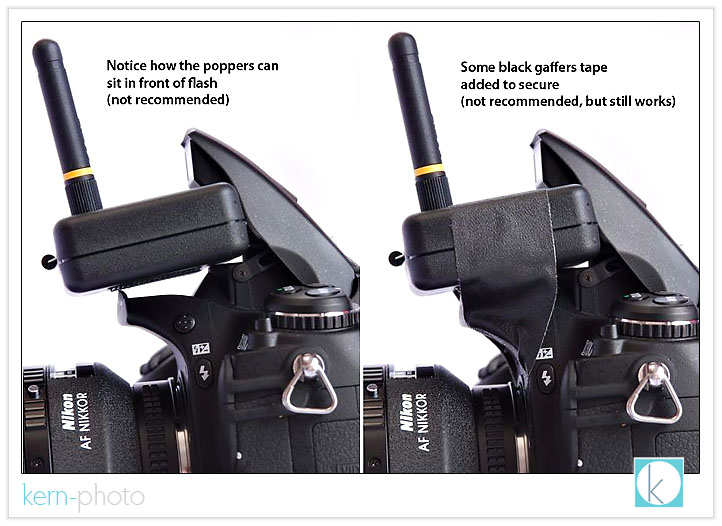
this is a far better alternative... to learn more about this, be sure to check out instructions here on how to "macgyver" your own mount using the puffer as featured below.
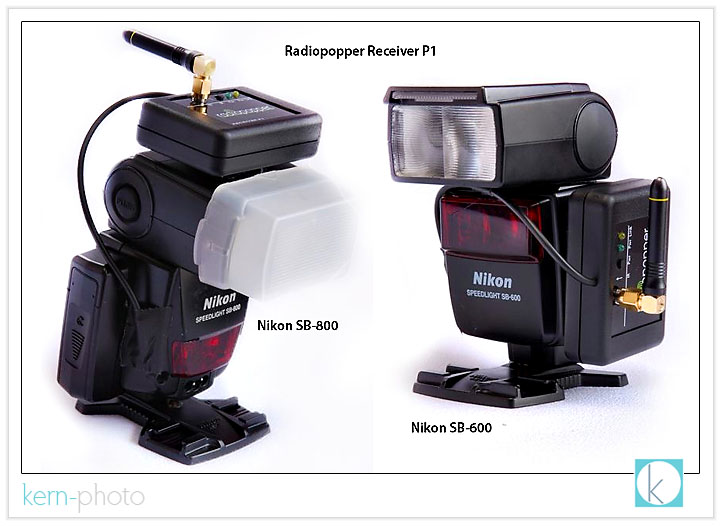
featured below are the radiopopper p1 receivers mounted with the supplied industrial-strength velcro. due to limited real estate on the flash body, i chose to mount the receiver on top of the nikon sb-800 and on the side of the sb-600 flash. you can shorten the optical cable using a sharp blade, but i chose to keep the original length, at least for now. notice the direction where the antennae point for optimal reception.
introducing the full 'C3-PO' setup, allowing the speedlight to be safely positioned from just about anywhere, including hanging upside down from a tree branch:
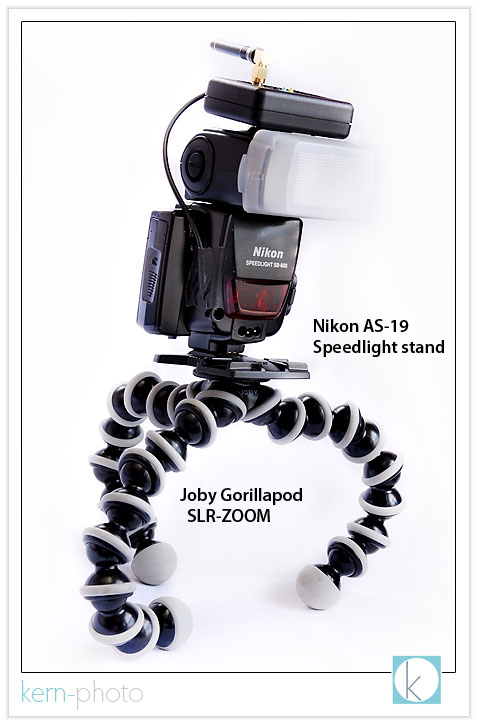
while the joby gorillapod serves as a great lightweight and portable lightstand that can be wrapped around my camera bag when not in use. they are nearly indestructible to dirt, sand, water. wish i could say the same about more photo equipment :)
the nikon as-19 speedlight stand comes with the sb-600 and sb-800 flashes. on the underside, the stand features the standard 1/4" thread that fits most lightstands and tripod mounts. this is a nice little golden nugget for securely locking in the nikon flash.
TEST PHOTOS:
in all flash examples i used a nikon d-300 with a 70-200 f/2.8 lens and a nikon sb-800 speedlight set at full power. the flash is positioned on the ground behind the dark bush just to the right of mr. deer and is using the 'C3-PO' setup pictured above. i was able to obtain 100% triggering reliability, which was an absolute first when triggering wireless speedlights off-camera. that was so freeing!
below: f/2.8 at 1/1500 sec with a focal length of 75mm (notice the "pretty" foreground & background bokeh)
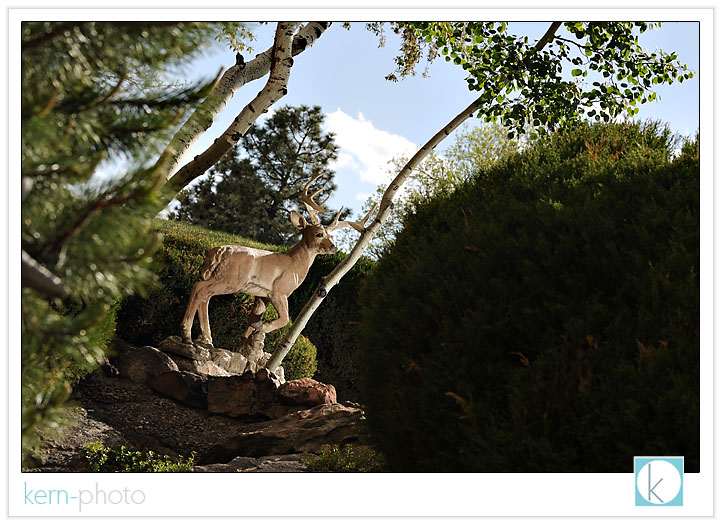
below: f/8 at 1/250 sec, with a focal length of 75mm (greater foreground & background detail makes it more difficult to isolate subject)
here's a closer detail shot zoomed in to 200m (300mm effective focal length on the d-300).
LEFT: f/2.8 at 1/1500 sec (NO FLASH)
RIGHT: f/8 at 1/250 sec (NO FLASH)
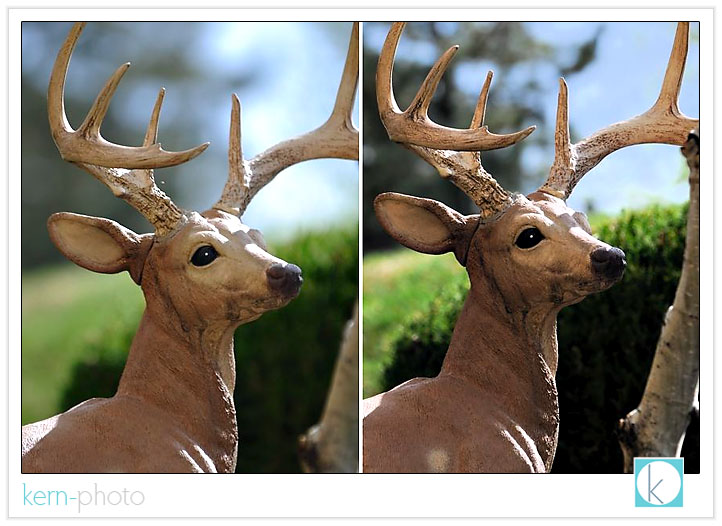
to my taste, the image on the left without flash would be preferred. notice what the image on the right brings to the table... more (unwanted) detail.
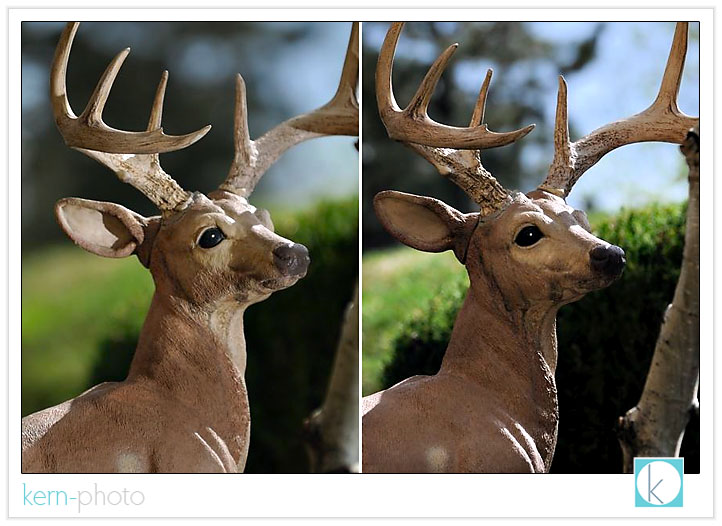
now it is time to compare apples to apples using a flash... this is where it would be impossible to create an image above 1/250 or 1/500 with standard pocketwizards (cameras max shutter sync varies.... the d-70 has 1/500 sec flash-sync while the d-3 and d-300 have only 1/250 sec). check this: compare the background on the u
LEFT: f/2.8 at 1/1500 sec with FLASH at FULL POWER (1/1) which creates less out of focus detail than if we use...
RIGHT: f/8 at 1/250 sec with FLASH at FULL POWER (1/1) and gets greater background detail :(
now here comes a mini-lightbulb experience: notice the two shots below the backgrounds are similar, except one is slightly darker than the other. why? even though they are both shot at f/2.8, the image on the left was shot at a shutter speed of 1/750 (with no flash) and the one on the right was shot at a shutter speed of 1/1500, one stop faster. because they both were shot at f/2.8, the quality of the background highlights out of focus (remember bokeh?) remains the same, especially in the green areas. because these were shot handheld (not on a tripod), slight differences in the blue and black colors in the background result from a slight shift in shooting position. the only difference is one appears slightly darker than the other because of the shutter speed change.

pictured below, bambi serves as a decent lighting model despite harsh overhead sun conditions. however, we can isolate bambi from the background a little easier by overpowering the ambient light triggering our speedlights with radiopoppers shooting at f/4 and 1/8000 sec with ISO set 400 to boost the flash power a tad (flash still set at full-power). notice that the sun is not completely overpowering, as we can still see rim light on bambi and abundant ambient light in the background:
a few more things to think about:
1 - mr. deer & bambi didn't move the whole time, which made it nice for comparison photography for the purpose of this review. however, if we were trying to stop action, the faster shutter speeds would really come in handy, like freezing water drops mid-air or photographing in super windy conditions.
2 - flash isn't always a good thing, especially in real wildlife photography. i'm not sure if i would want to use a flash on a real deer. i might not make it home in one piece. to paraphrase yoda, "know when to use the force, you should."
FINAL THOUGHTS:
if you do not already own a pair of pocketwizards and use speedlights off-camera, then i would 100% recommend radiopoppers for triggering reliability, ease of use, and ttl-metering.
if you fall into the same aforementioned camp and are a strobist, then i would 199% recommend radiopoppers.
if you already own a pair of reliable radio slaves or pocketwizards and consider using speedlights in your off-camera lighting, i would 50% recommend the radiopoppers for the added ease of use in changing power output from holding your camera.
if you do not want use speedlights off-camera (canon or nikon), then save your money.
__________
ps- for those strobists who just wanna know, here's the lighthing setup for photographing the speedlights: shot sans flash using a single 40" reflector positioned about a foot away with a white sheet underneath. the setup was about 2 feet from western facing window with blinds closed slightly and outside with sun set at full-colorado-power. 1/8 second exposure at f/8 for depth of field using iso 400 on a nikon d-80 with a focal length of 70mm and iso set to cloudy. whew.