
tips for interior design photography
03.08.08 | photo-resources
armed with lighting techniques proselytized by
the strobist,
we think of interior design photography as a
natural blend between landscape and portrait
photography. architectural and interior design
photography is something that is rather new for
us. in all reality, techniques are similar which
include nailing exposure with multiple off-camera
flashes, diffusing light, balancing various color
temperatures, and most importantly, working fast
with minimal equipment.
many of the images found in expensive interior design catalogs are created by photographers using large studios and tons of lighting equipment to mimic the look of natural light. however, when photographing the interior of homes, one may still accomplish a similar look with a minimal footprint.
key ingredients to obtaining simple, clean interior design lighting include using a sturdy tripod and learning to use flash to light interiors. with proper tools, you can shoot with little ambient light and still create an image that looks creatively different. striving to keep it simple and do more with less, here are our top ten tips to photograph interior design and architecture:
10. hide lights with a small tripod. we like the cheap 6-8 inch ones because the small footprint makes them easier to conceal.
9. higher ISOs give flashes more power. 400 seems to work well.
8. think about sharpness and depth of field. you probably knew that, however if you stop down too much, say to f/22, you risk diffraction (bending of light) that can lead to softer images. using a 12mm lens on digital body (18mm on film camera) you do not have to be stop down as much to obtain a workable depth of field than say that of a 50mm lens. if you want an extreme shallow depth of field good for isolating details, shoot wide open (f/1.4) with a medium telephone lens (like in the range of 85mm to 200mm) and move close to your subject. getting close to your subject to further decrease depth of field.
7. diffuse your flash. don't go for the deer in the headlights look which will result in harsh light with deep shadows. experiment by using a small softbox or umbrella bounced against a white wall, which can create wonderful, clean light.
6. bounce light off of a wall. if possible, the wall bounce creates a much larger apparent light source and yields softer shadows. a little light source from a small flash head will create harder light. a bigger light source bounced off a wall will yield softer light, similar to that of a soft-box. when you walk into a room, look for walls that may not show up in the photo.... those will be perfect for bouncing.
5. gel your flashes. save time in post-processing by balancing your light temperatures in-camera. for example, if you are shooting a room with incandescent ambient light, use an orange gel on your flash and change your camera's white balance to incandescent (the one that looks like a light bulb). this will trick the camera and will make your flash and the ambient light look the same shade of white. read your owner's manual to learn more. experiment using blue gels and mixing up the in-camera white balance for some creative effects.
4. avoid color casts. if you bounce off a blue wall, expect your light to be cool and blue. bounce off a red wall, expect the bounced light to be unnaturally warm. also, expect to use more power in rooms with dark walls and ceilings, since the light won't be bounced around as much.
3. start small first. if you’re accustomed to shooting with one on-camera light, the best way to ease into shooting with off-camera lights is to start small. try a small bedroom, turn off your on-camera light and use only the remote one, placed a few feet away and bounced off the wall, to get used to the idea. then discover tricks of “hiding” the light source from the camera like under a table or behind a big chair. then, add in the on-camera light with a diffuser for fill.
2. place off-camera strobes a foot taller than furniture. this creates a more natural feeling for lighting and shadows and can closely mimic window light. bouncing off the ceiling creates a less-natural effect, kind of like the ceiling is one giant room-sized skylight.
1. expose for the exterior. start with ambient-only exposure and meter manually. this means if you want to make the light outside the window appear natural, you may need increase exposure time to 2 or 3 seconds if you are shooting at twilight or to 1/60th if want to make the light outside the white "blown-out" window look like daylight. the next step is to use your off-camera lighting (strobes or flashes) to bring the interior or main subject to a similar exposure level. do not be afraid to chimp to see if your effect is working. while it may seem counter intuitive to expose the outside light first, by doing so, you allow for far greater lighting freedom of your subject.
ps- triggering lights via the wireless nikon and canon setups can be problematic as the signals will not bend around corners, as they are line-of-sight only. radio triggers like pocketwizards or other brands of radio slaves are generally far more reliable.
extra credit: one of the most difficult concepts for first timers to wrap their head around is this: shutter speed will control the windows/ambient light and aperture will control the strobes. this same philosophy may be applied to many different styles of photography.
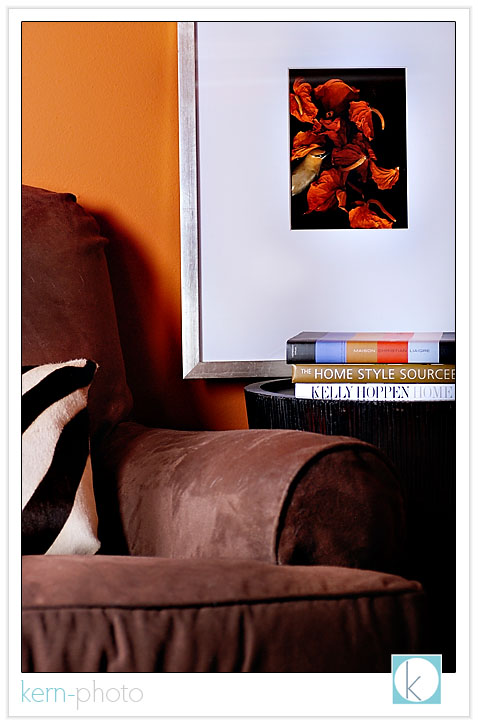
teri carr at atmosphere homestyle proudly displays some of her interior design work. teri invited me last week to photograph some of her interior design work. as part of our time together, i shared with her some of our lighting tricks. we also produced a small body of photographs for her interior design portfolio.

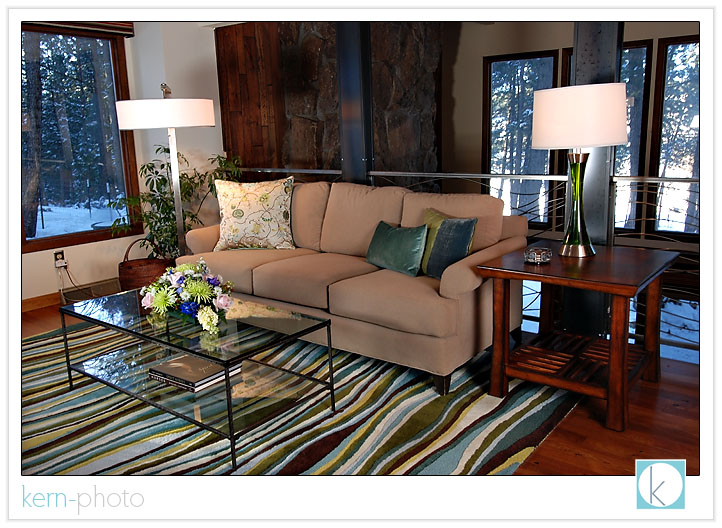
here, a small flash with an umbrella was bounced off a wall to the right. notice the outside light closely matches with the inside light. in addition, a orange gel was placed over the flash to balance the incandescent light from the lamps. camera wb set to incandescent.
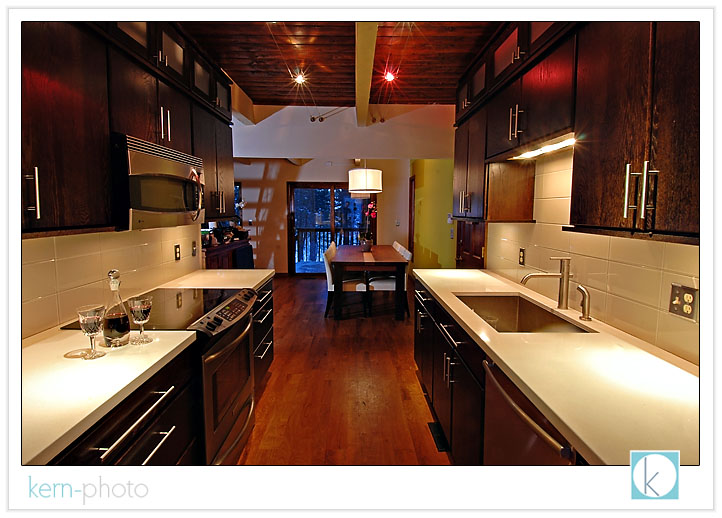
this shot was taken with a tripod with 3 second exposure and a flash triggered remotely around the corner to make the green wall pop in the background. notice the stairwell shadow in the background and shadows cast by the chairs at the table. our nikon 12-24 f/4 lens was used to capture the wide-angle of the kitchen.
a flash isn't always necessary to use inside. this shot was taken with no flash and no tripod using only available light found in an overhead fixture. we like the simplicity of the green background and the single white orchid.
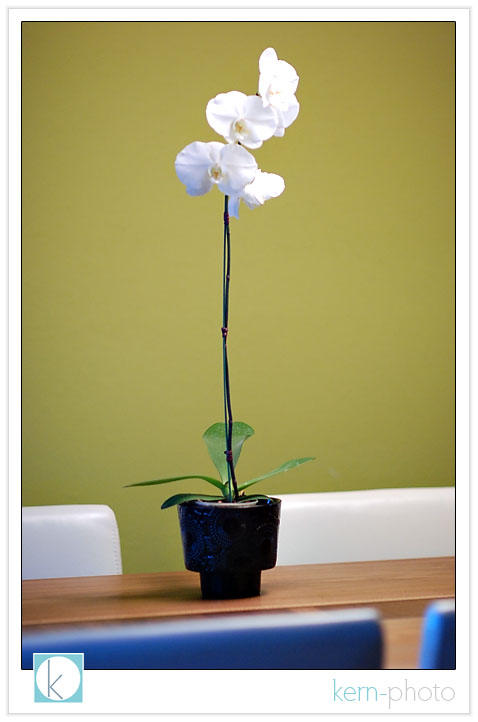
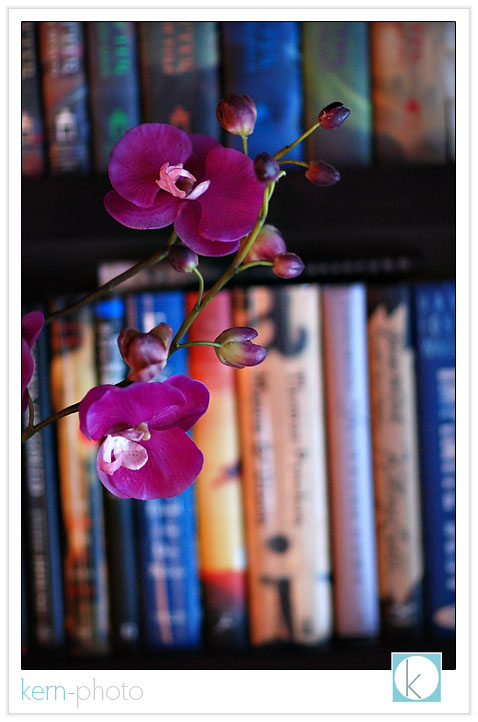
using shallow depth of field (f/1.4 on an 85mm lens) makes it easier to blur out the background of this flower lit from a north-facing window to the camera right.
one of the nice perks to interior photography is the comfort of being warm and dry, a pleasant perk compared to landscape photography our soul and gear are up against rain, snow, and wind :)
many of the images found in expensive interior design catalogs are created by photographers using large studios and tons of lighting equipment to mimic the look of natural light. however, when photographing the interior of homes, one may still accomplish a similar look with a minimal footprint.
key ingredients to obtaining simple, clean interior design lighting include using a sturdy tripod and learning to use flash to light interiors. with proper tools, you can shoot with little ambient light and still create an image that looks creatively different. striving to keep it simple and do more with less, here are our top ten tips to photograph interior design and architecture:
10. hide lights with a small tripod. we like the cheap 6-8 inch ones because the small footprint makes them easier to conceal.
9. higher ISOs give flashes more power. 400 seems to work well.
8. think about sharpness and depth of field. you probably knew that, however if you stop down too much, say to f/22, you risk diffraction (bending of light) that can lead to softer images. using a 12mm lens on digital body (18mm on film camera) you do not have to be stop down as much to obtain a workable depth of field than say that of a 50mm lens. if you want an extreme shallow depth of field good for isolating details, shoot wide open (f/1.4) with a medium telephone lens (like in the range of 85mm to 200mm) and move close to your subject. getting close to your subject to further decrease depth of field.
7. diffuse your flash. don't go for the deer in the headlights look which will result in harsh light with deep shadows. experiment by using a small softbox or umbrella bounced against a white wall, which can create wonderful, clean light.
6. bounce light off of a wall. if possible, the wall bounce creates a much larger apparent light source and yields softer shadows. a little light source from a small flash head will create harder light. a bigger light source bounced off a wall will yield softer light, similar to that of a soft-box. when you walk into a room, look for walls that may not show up in the photo.... those will be perfect for bouncing.
5. gel your flashes. save time in post-processing by balancing your light temperatures in-camera. for example, if you are shooting a room with incandescent ambient light, use an orange gel on your flash and change your camera's white balance to incandescent (the one that looks like a light bulb). this will trick the camera and will make your flash and the ambient light look the same shade of white. read your owner's manual to learn more. experiment using blue gels and mixing up the in-camera white balance for some creative effects.
4. avoid color casts. if you bounce off a blue wall, expect your light to be cool and blue. bounce off a red wall, expect the bounced light to be unnaturally warm. also, expect to use more power in rooms with dark walls and ceilings, since the light won't be bounced around as much.
3. start small first. if you’re accustomed to shooting with one on-camera light, the best way to ease into shooting with off-camera lights is to start small. try a small bedroom, turn off your on-camera light and use only the remote one, placed a few feet away and bounced off the wall, to get used to the idea. then discover tricks of “hiding” the light source from the camera like under a table or behind a big chair. then, add in the on-camera light with a diffuser for fill.
2. place off-camera strobes a foot taller than furniture. this creates a more natural feeling for lighting and shadows and can closely mimic window light. bouncing off the ceiling creates a less-natural effect, kind of like the ceiling is one giant room-sized skylight.
1. expose for the exterior. start with ambient-only exposure and meter manually. this means if you want to make the light outside the window appear natural, you may need increase exposure time to 2 or 3 seconds if you are shooting at twilight or to 1/60th if want to make the light outside the white "blown-out" window look like daylight. the next step is to use your off-camera lighting (strobes or flashes) to bring the interior or main subject to a similar exposure level. do not be afraid to chimp to see if your effect is working. while it may seem counter intuitive to expose the outside light first, by doing so, you allow for far greater lighting freedom of your subject.
ps- triggering lights via the wireless nikon and canon setups can be problematic as the signals will not bend around corners, as they are line-of-sight only. radio triggers like pocketwizards or other brands of radio slaves are generally far more reliable.
extra credit: one of the most difficult concepts for first timers to wrap their head around is this: shutter speed will control the windows/ambient light and aperture will control the strobes. this same philosophy may be applied to many different styles of photography.
teri carr at atmosphere homestyle proudly displays some of her interior design work. teri invited me last week to photograph some of her interior design work. as part of our time together, i shared with her some of our lighting tricks. we also produced a small body of photographs for her interior design portfolio.
here, a small flash with an umbrella was bounced off a wall to the right. notice the outside light closely matches with the inside light. in addition, a orange gel was placed over the flash to balance the incandescent light from the lamps. camera wb set to incandescent.
this shot was taken with a tripod with 3 second exposure and a flash triggered remotely around the corner to make the green wall pop in the background. notice the stairwell shadow in the background and shadows cast by the chairs at the table. our nikon 12-24 f/4 lens was used to capture the wide-angle of the kitchen.
a flash isn't always necessary to use inside. this shot was taken with no flash and no tripod using only available light found in an overhead fixture. we like the simplicity of the green background and the single white orchid.
using shallow depth of field (f/1.4 on an 85mm lens) makes it easier to blur out the background of this flower lit from a north-facing window to the camera right.
one of the nice perks to interior photography is the comfort of being warm and dry, a pleasant perk compared to landscape photography our soul and gear are up against rain, snow, and wind :)